QuREKA Guide
Overview
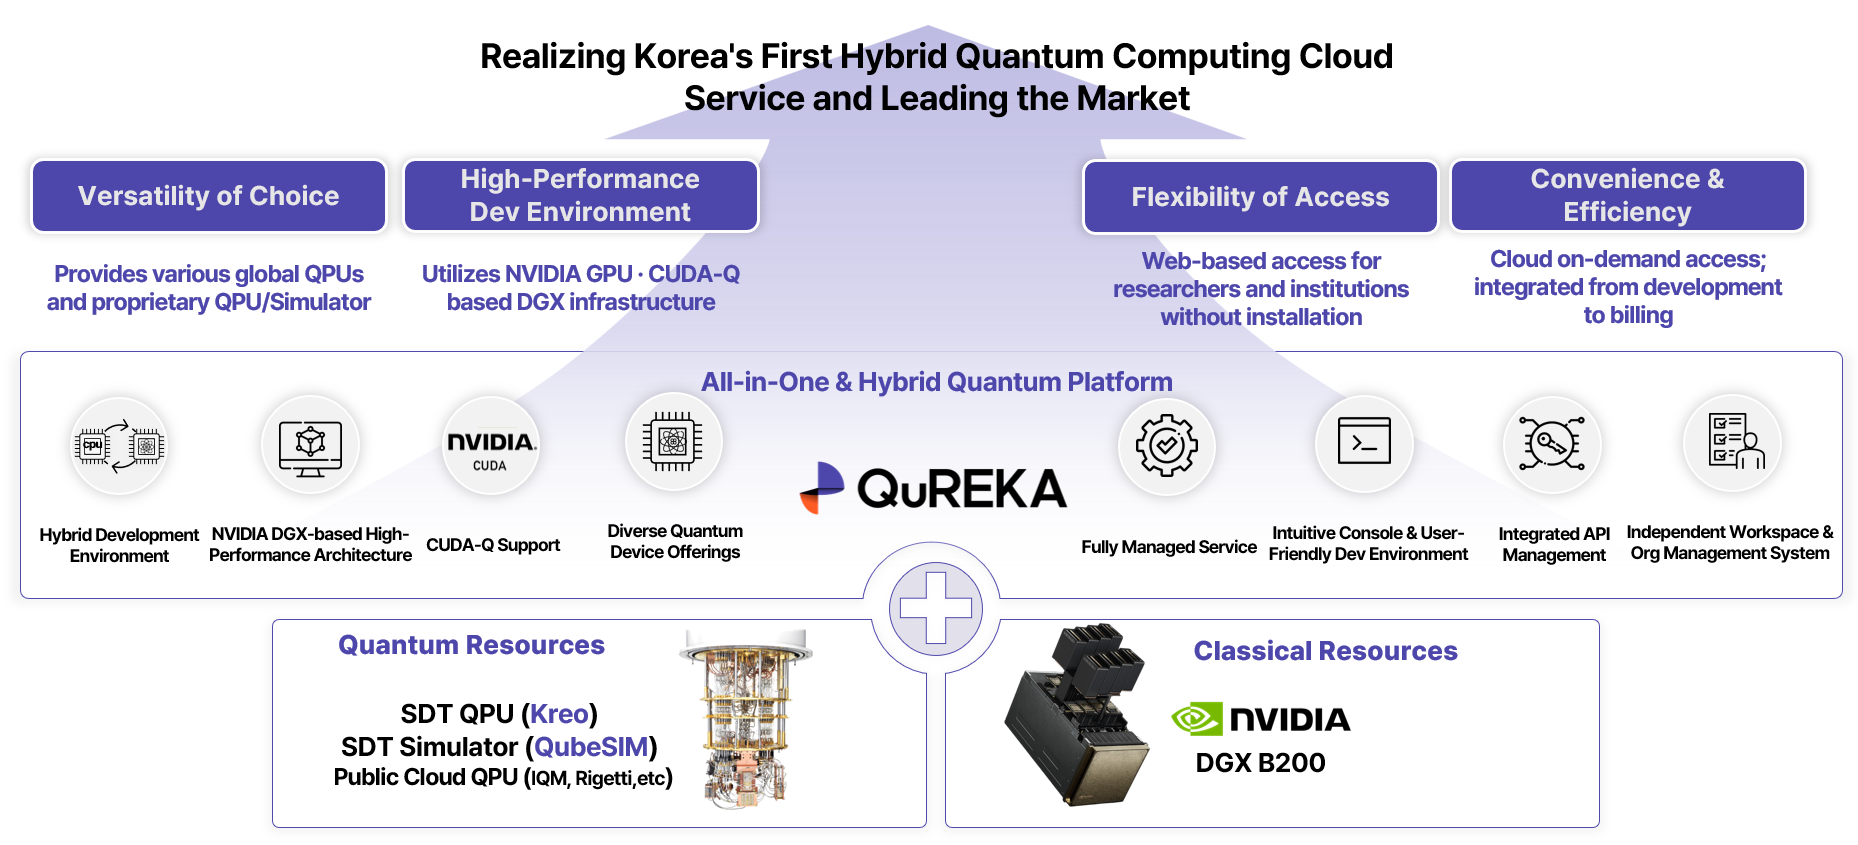
QuREKA is a hybrid quantum computing cloud platform built on the foundation of the Qube series solutions (QubeStack, QubePad, QubeSIM). It integrates classical computing infrastructure with quantum computing resources to provide a high-performance environment capable of tackling complex computational problems and optimization tasks.
By integrating core elements—such as a hybrid computing engine that automatically partitions and distributes classical and quantum operations, GPU-based high-performance simulators, resource orchestration, and real-time monitoring with advanced security—QuREKA ensures stable and efficient management of complex quantum-classical workloads.
Users can interact with the platform through a web-based console to submit jobs, monitor resources, and analyze results. The platform offers an intuitive and efficient development environment featuring project-based workspaces, GUI-based circuit design tools, and a variety of sample code templates.
At its core, QuREKA integrates the NVIDIA CUDA-Q architecture at the engine level to support GPU-accelerated large-scale quantum simulations and hybrid algorithm optimization. This allows existing CUDA and AI developers to utilize their familiar codebases and workflows within QuREKA, enabling rapid development of quantum algorithms without the need for additional environment configuration.
Service Preparation
Registration
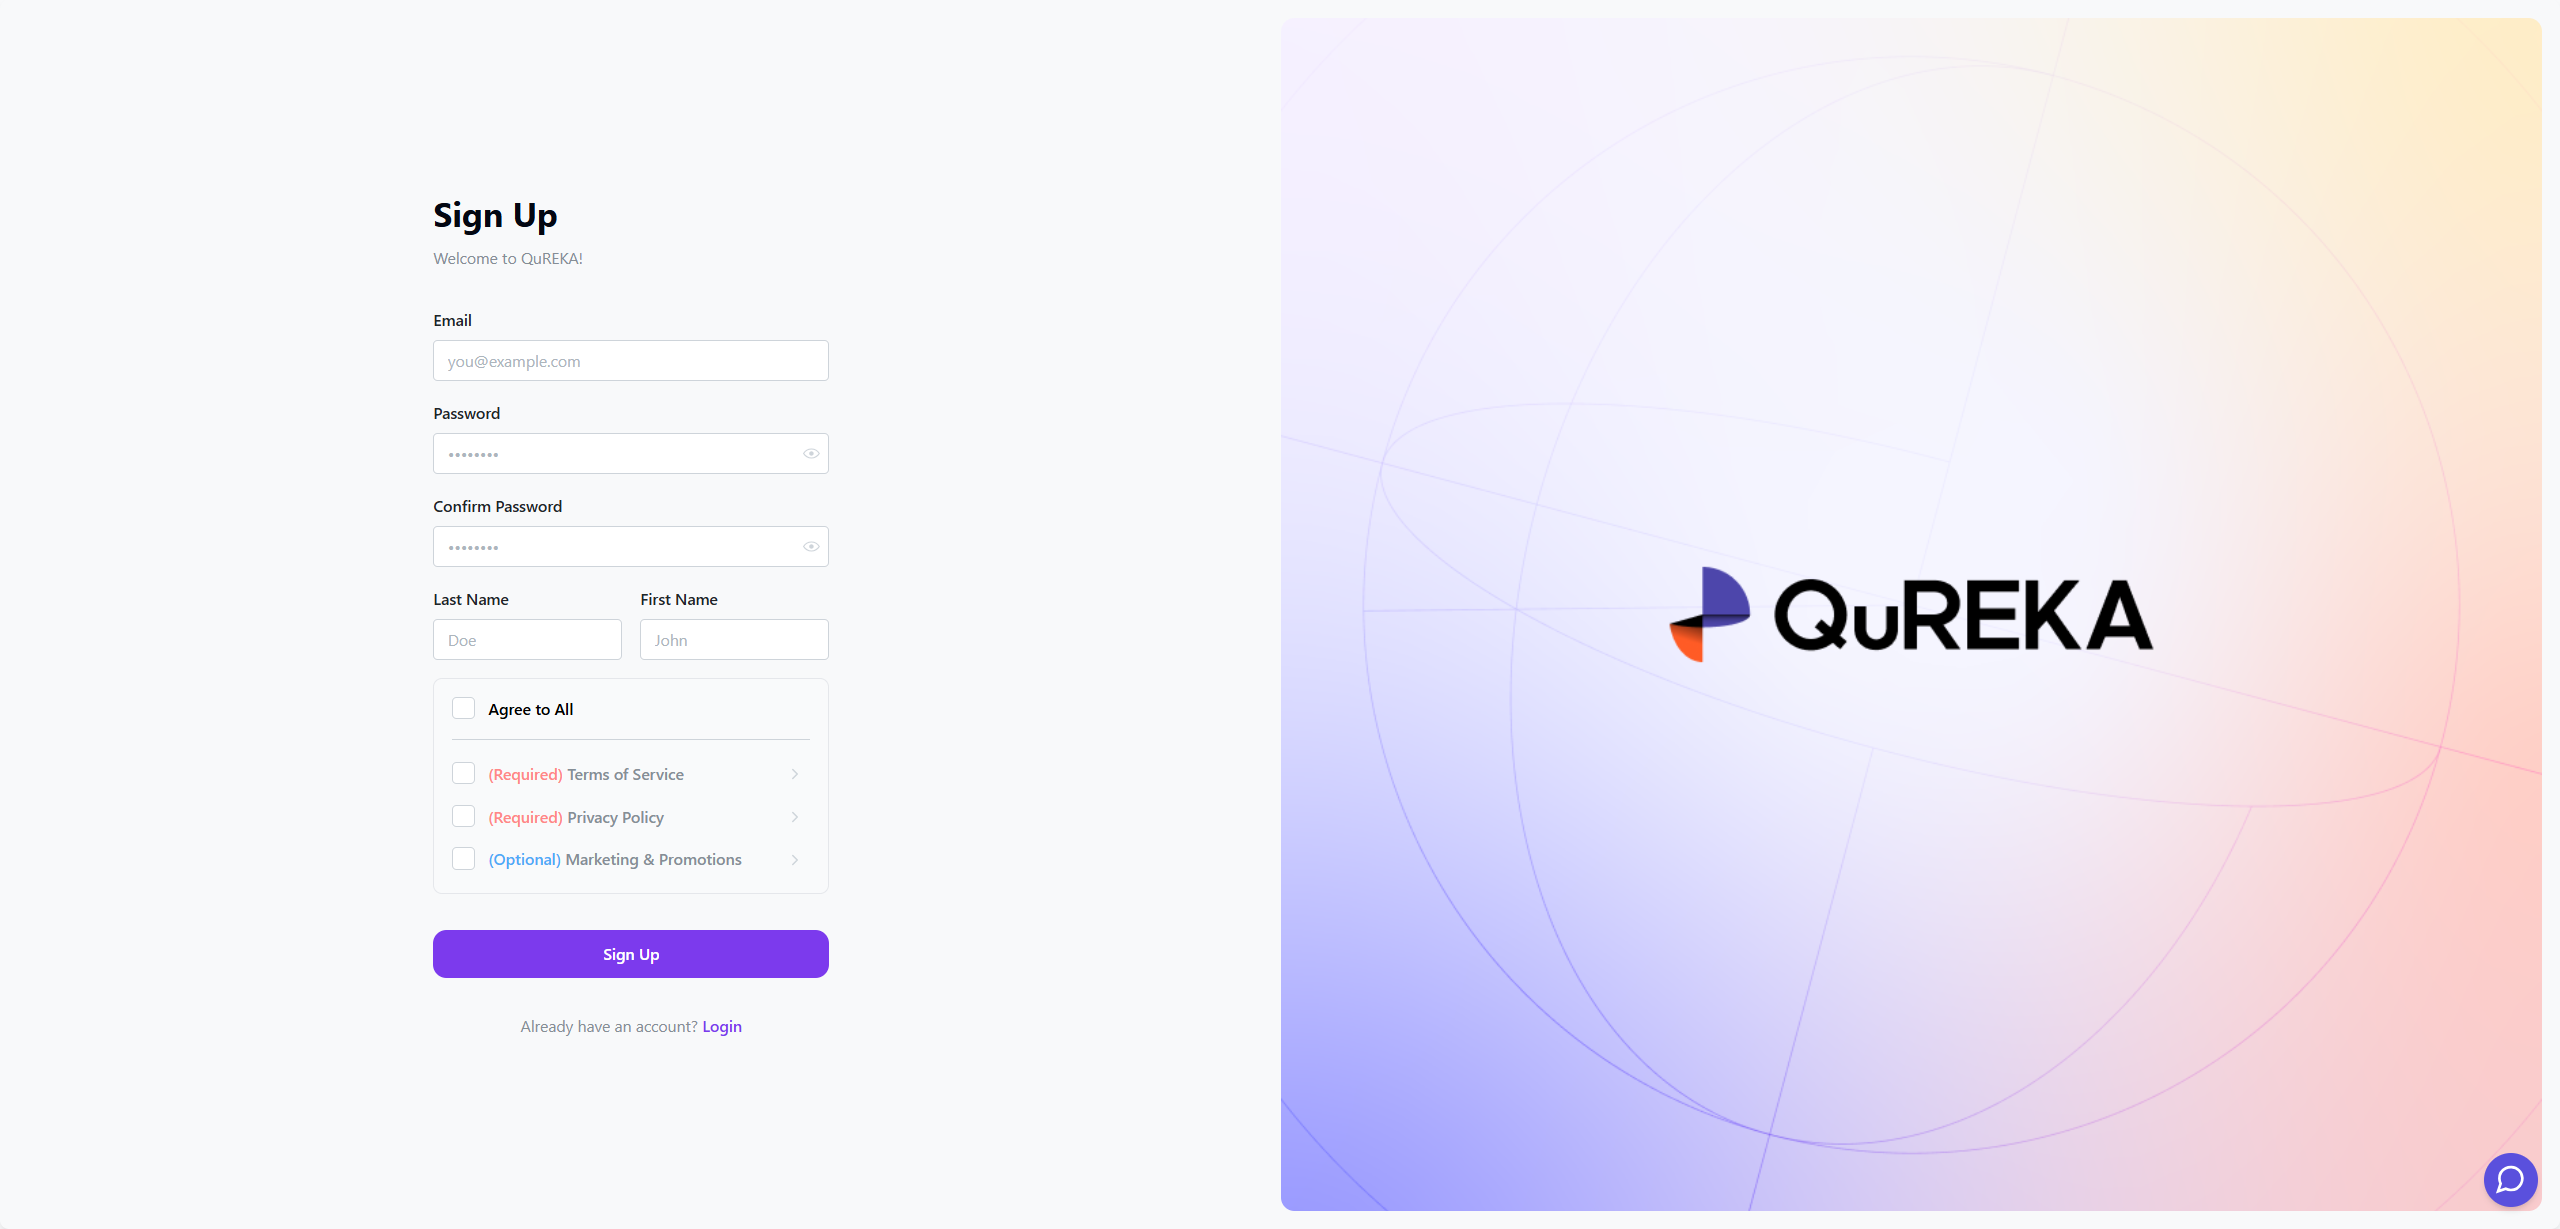
QuREKA is accessible instantly via web browser without the need for any software installation. Users can prepare to use all QuREKA services simply by accessing the QuREKA portal and completing the registration and login process.
API Key Generation
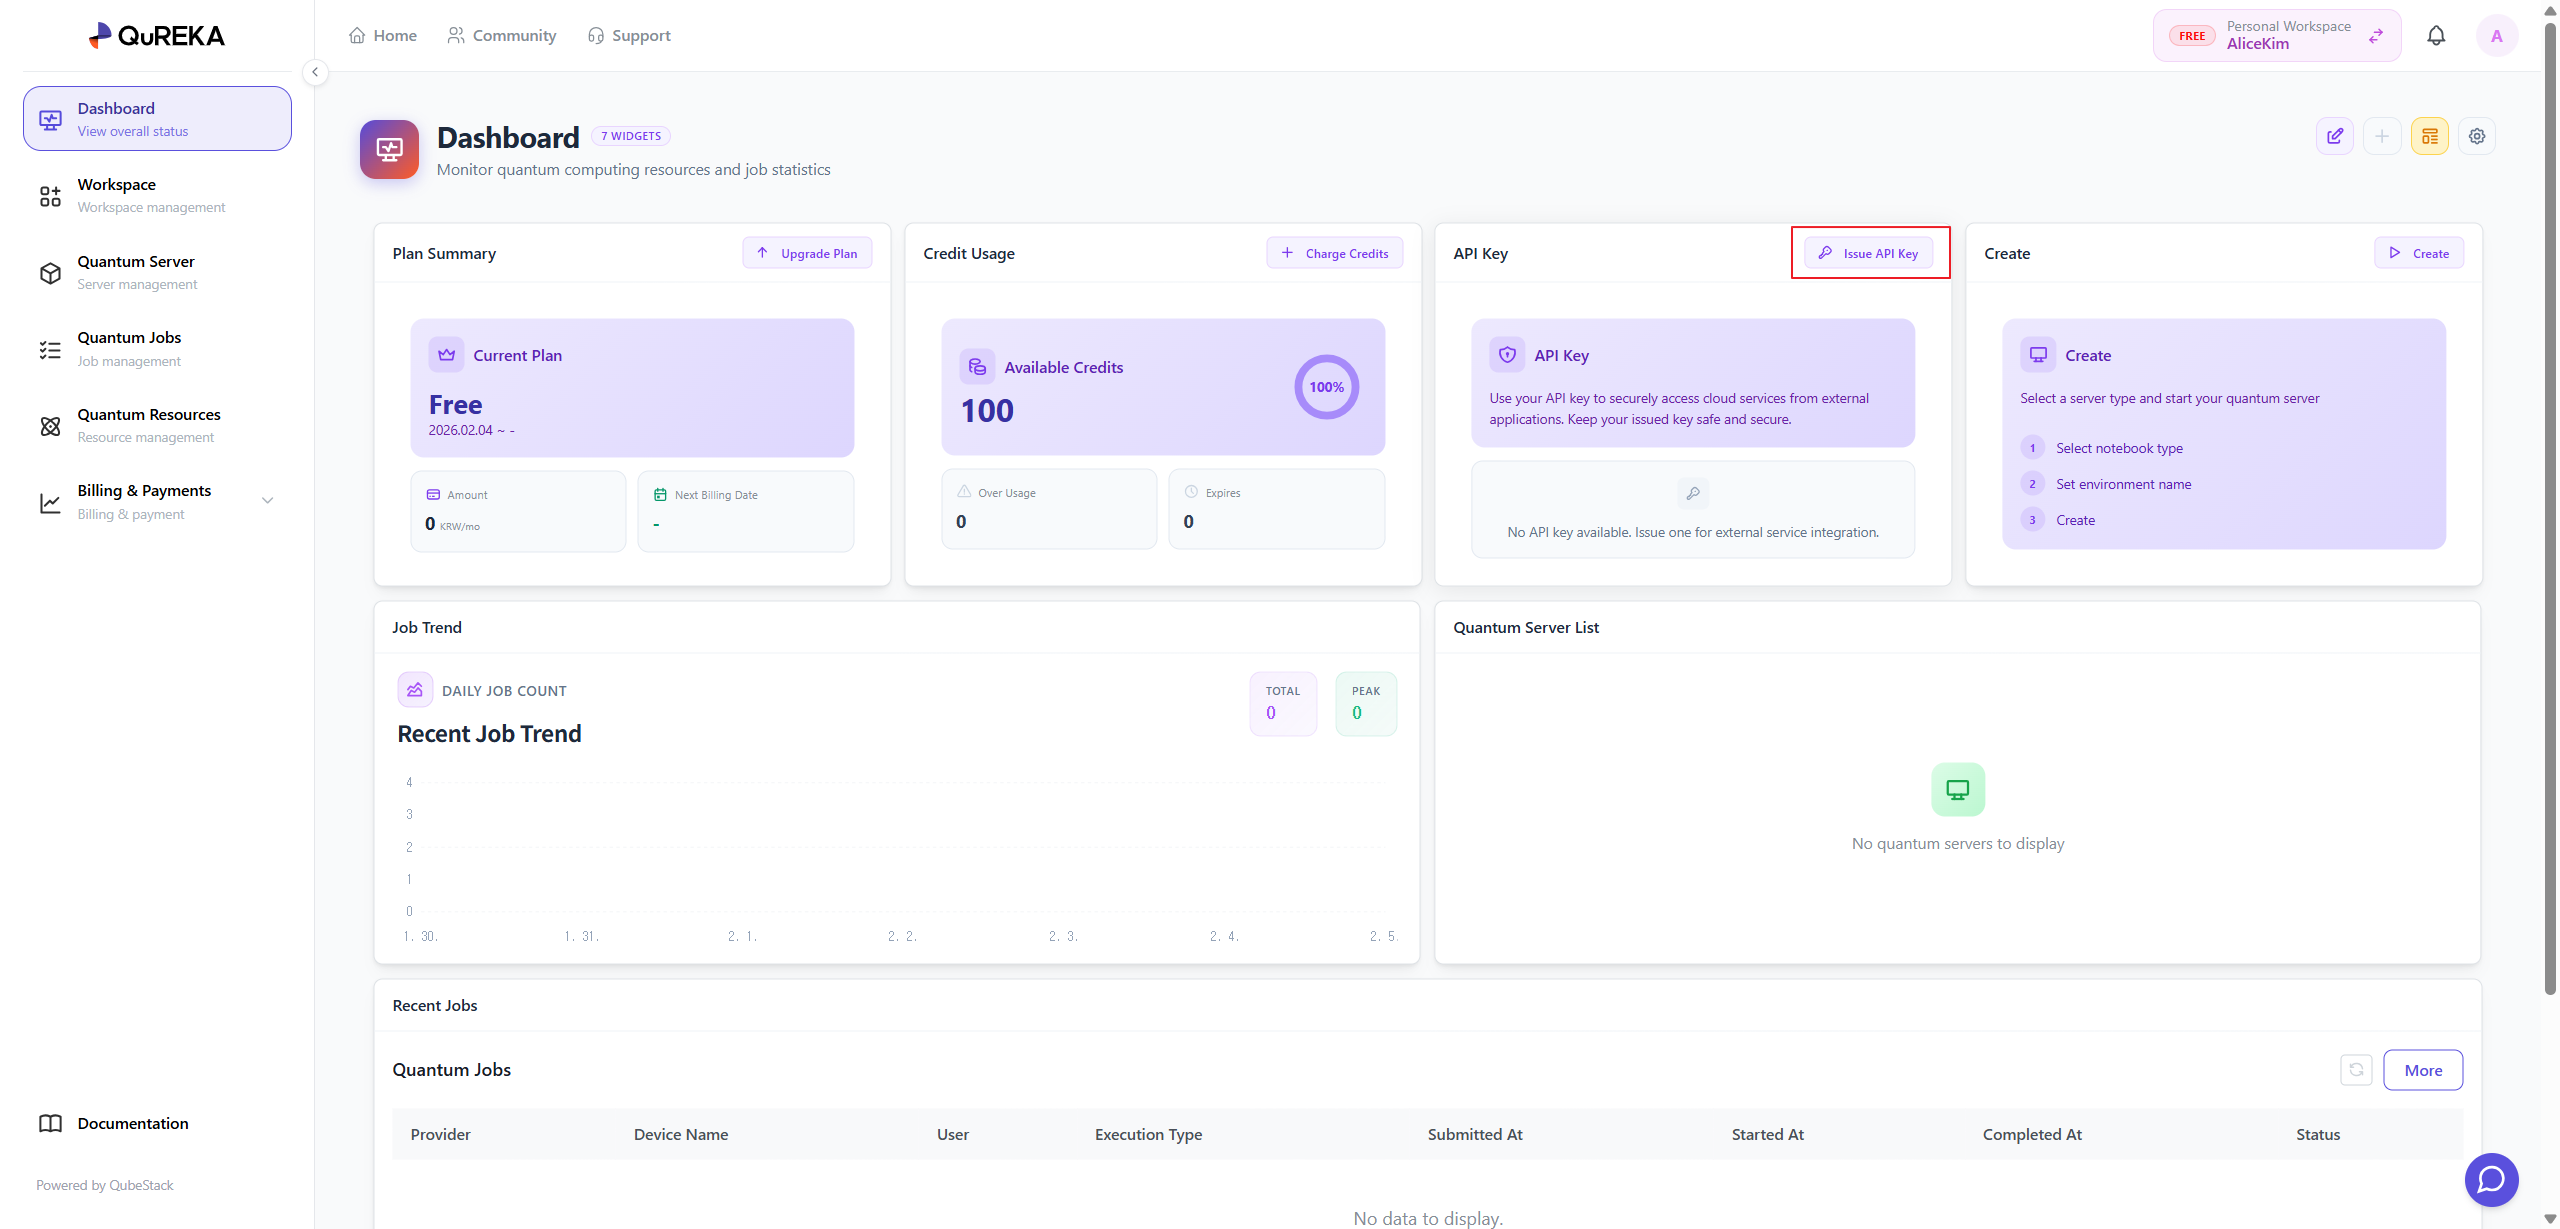
After logging in, click the Login or Get Started button on the QuREKA portal to access the console page. Upon successful access, the dashboard for your personal workspace will appear as shown in the image above.
[Dashboard Screen Image]
To use QuREKA's resources and SDKs, users must first obtain an API key. Click the [Generate API Key] button on the dashboard to issue your key.
[CAUTION] For security reasons, never share your API key with others. If you suspect your key has been compromised, please regenerate it immediately.
Workspace Creation and Invitation
QuREKA provides a management environment based on Workspaces for efficient collaboration. In addition to personal workspaces, users can create team workspaces for collaborative development and invite colleagues.
Creating a Team Workspace
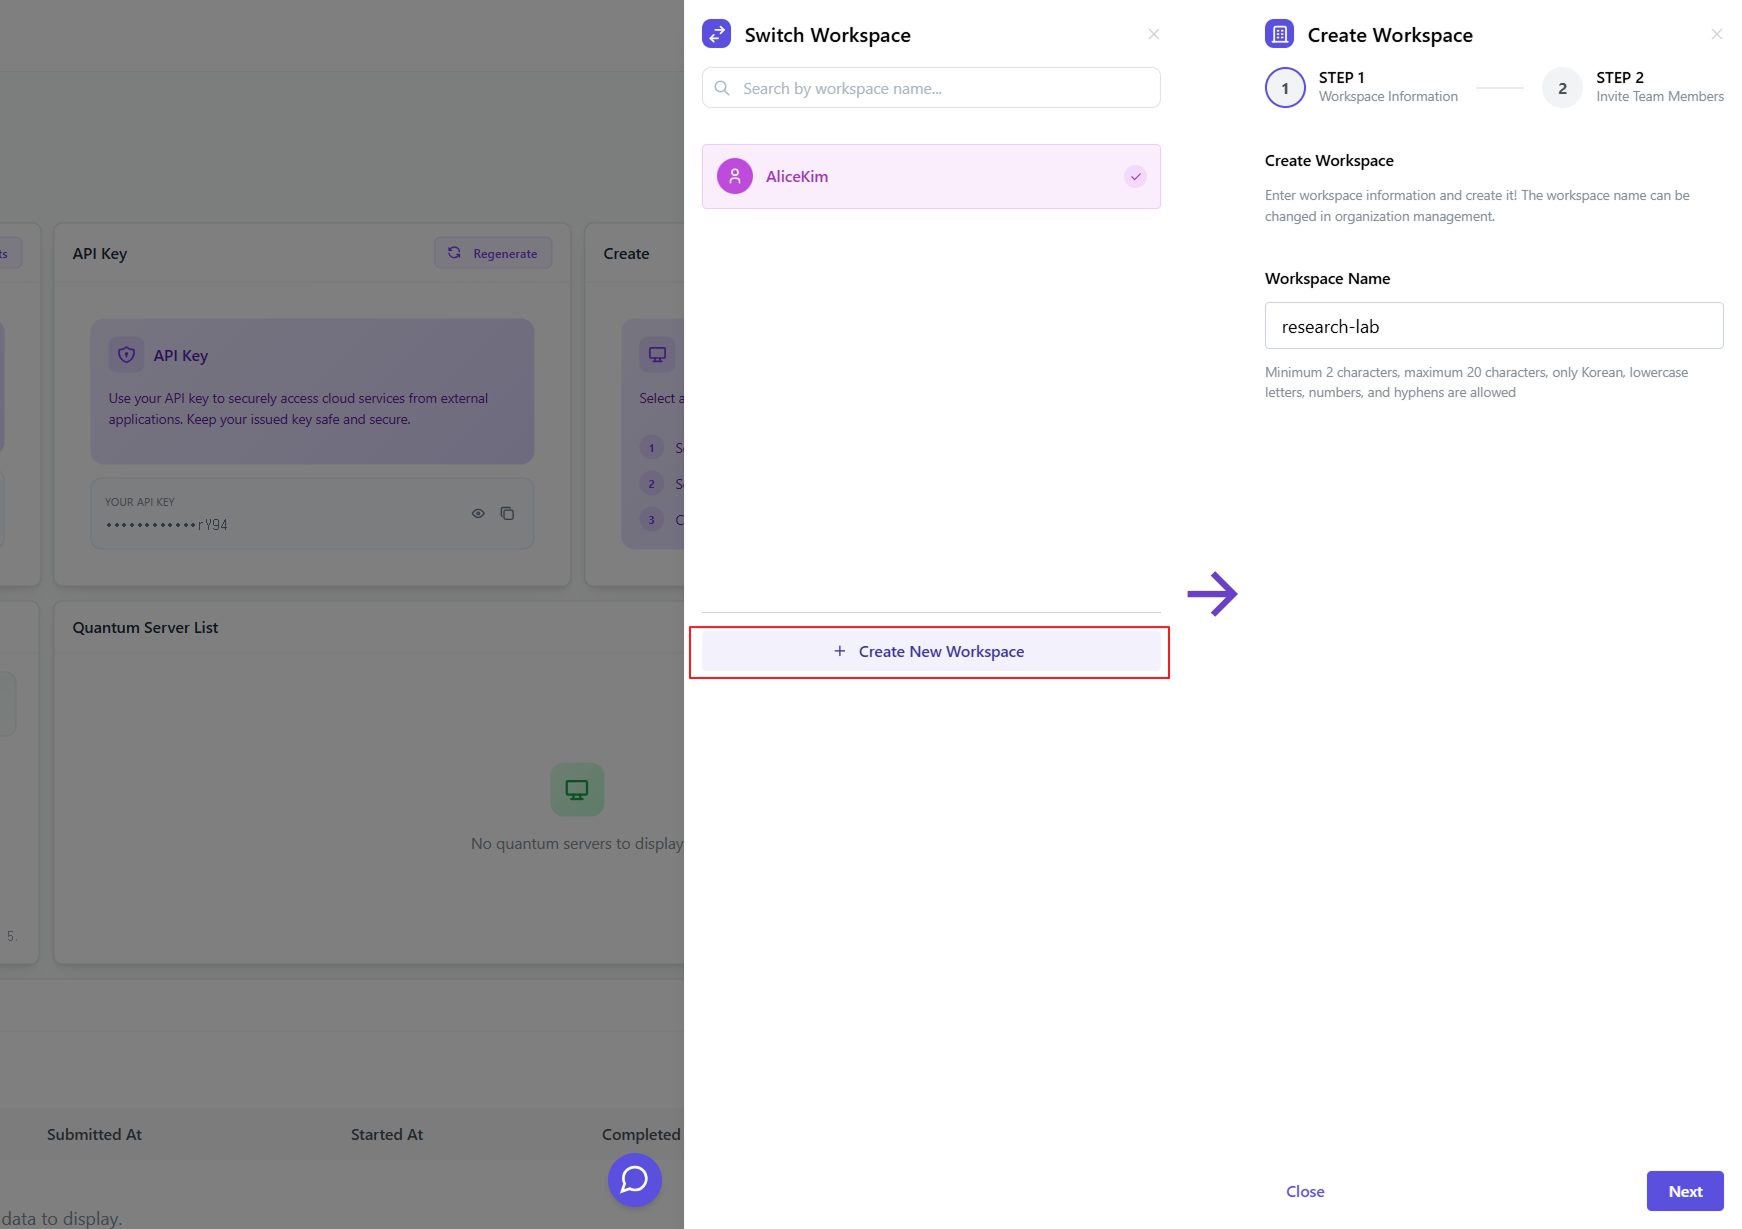
You can create a new team workspace by clicking the Workspace Switcher icon located at the top right of the screen.
Inviting Members to a Workspace
You can invite collaborators to your workspace. An invitation email will be sent to the email address entered during the invitation process.
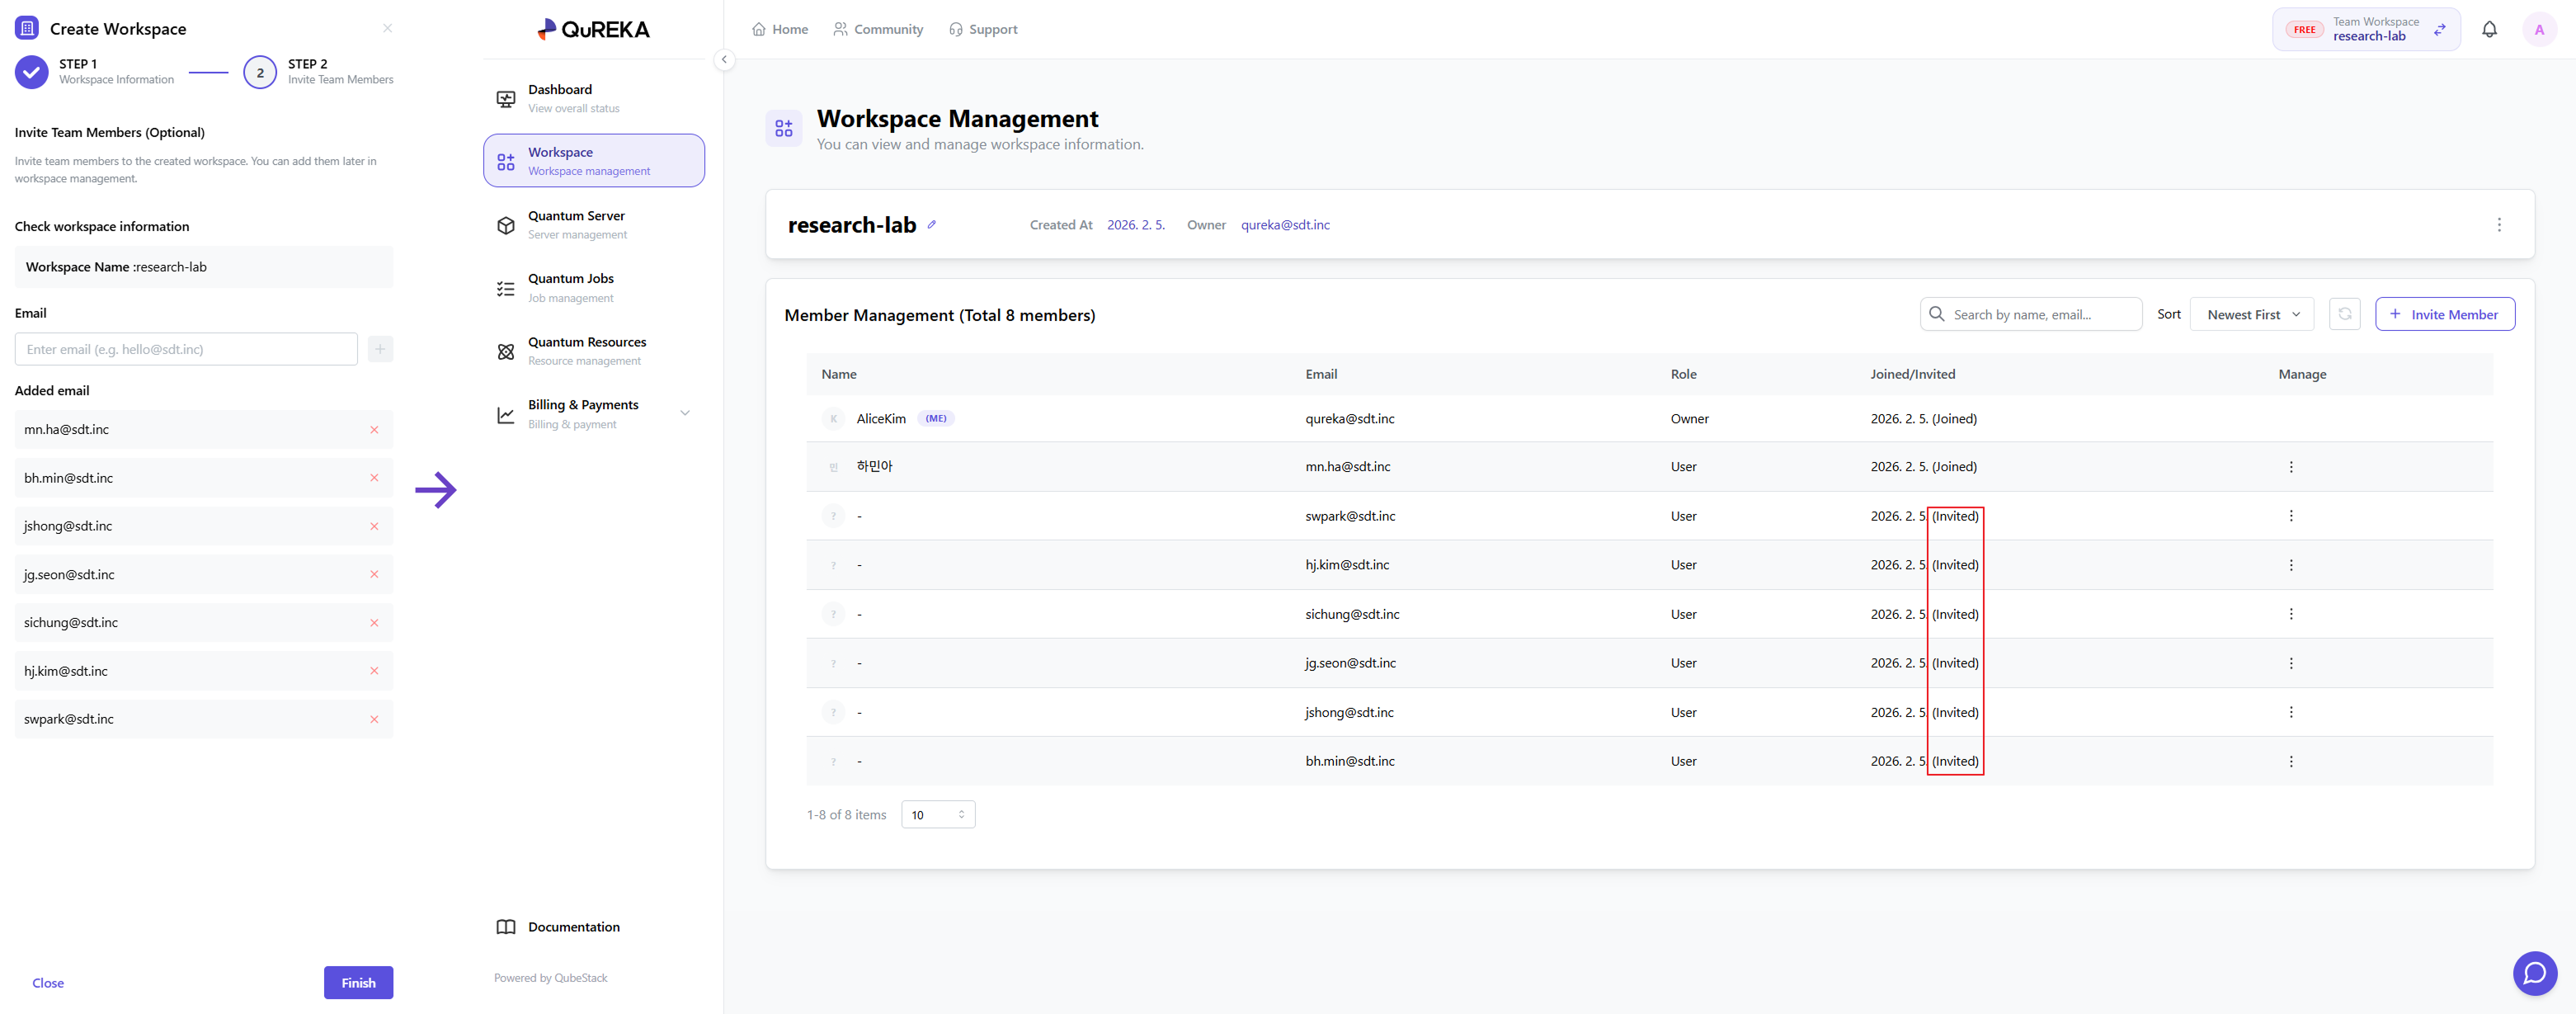
Workspace owners can add and manage development personnel later through the Workspace Management page.
Getting Started
Let’s walk through the process of requesting quantum jobs and verifying the results on QuREKA.
A Quantum Job refers to a sequence of programs or algorithms that include quantum circuits. These can range from a single circuit to complex classical-quantum hybrid computations such as VQE or QAOA. In this guide, we will create a simple quantum job containing a single quantum circuit.
1. Creating a Quantum Job
Creating a Quantum Server
To write and execute quantum circuit code, you must first create a Quantum Server. A Quantum Server provides dedicated computational resources for developing quantum algorithms.
- Access Path: You can access this via the Dashboard or the [Quantum Server] menu in the sidebar.
- How to Create: Click the [Create] button within the menu to create a new Quantum Server.
- Server Types by Subscription: The types and specifications (vCPU, RAM, GPU, etc.) of the Quantum Servers available to you vary depending on your current Subscription Plan. If the desired server specification is not active, please update your plan on the Subscription page.
Development Environment Configuration
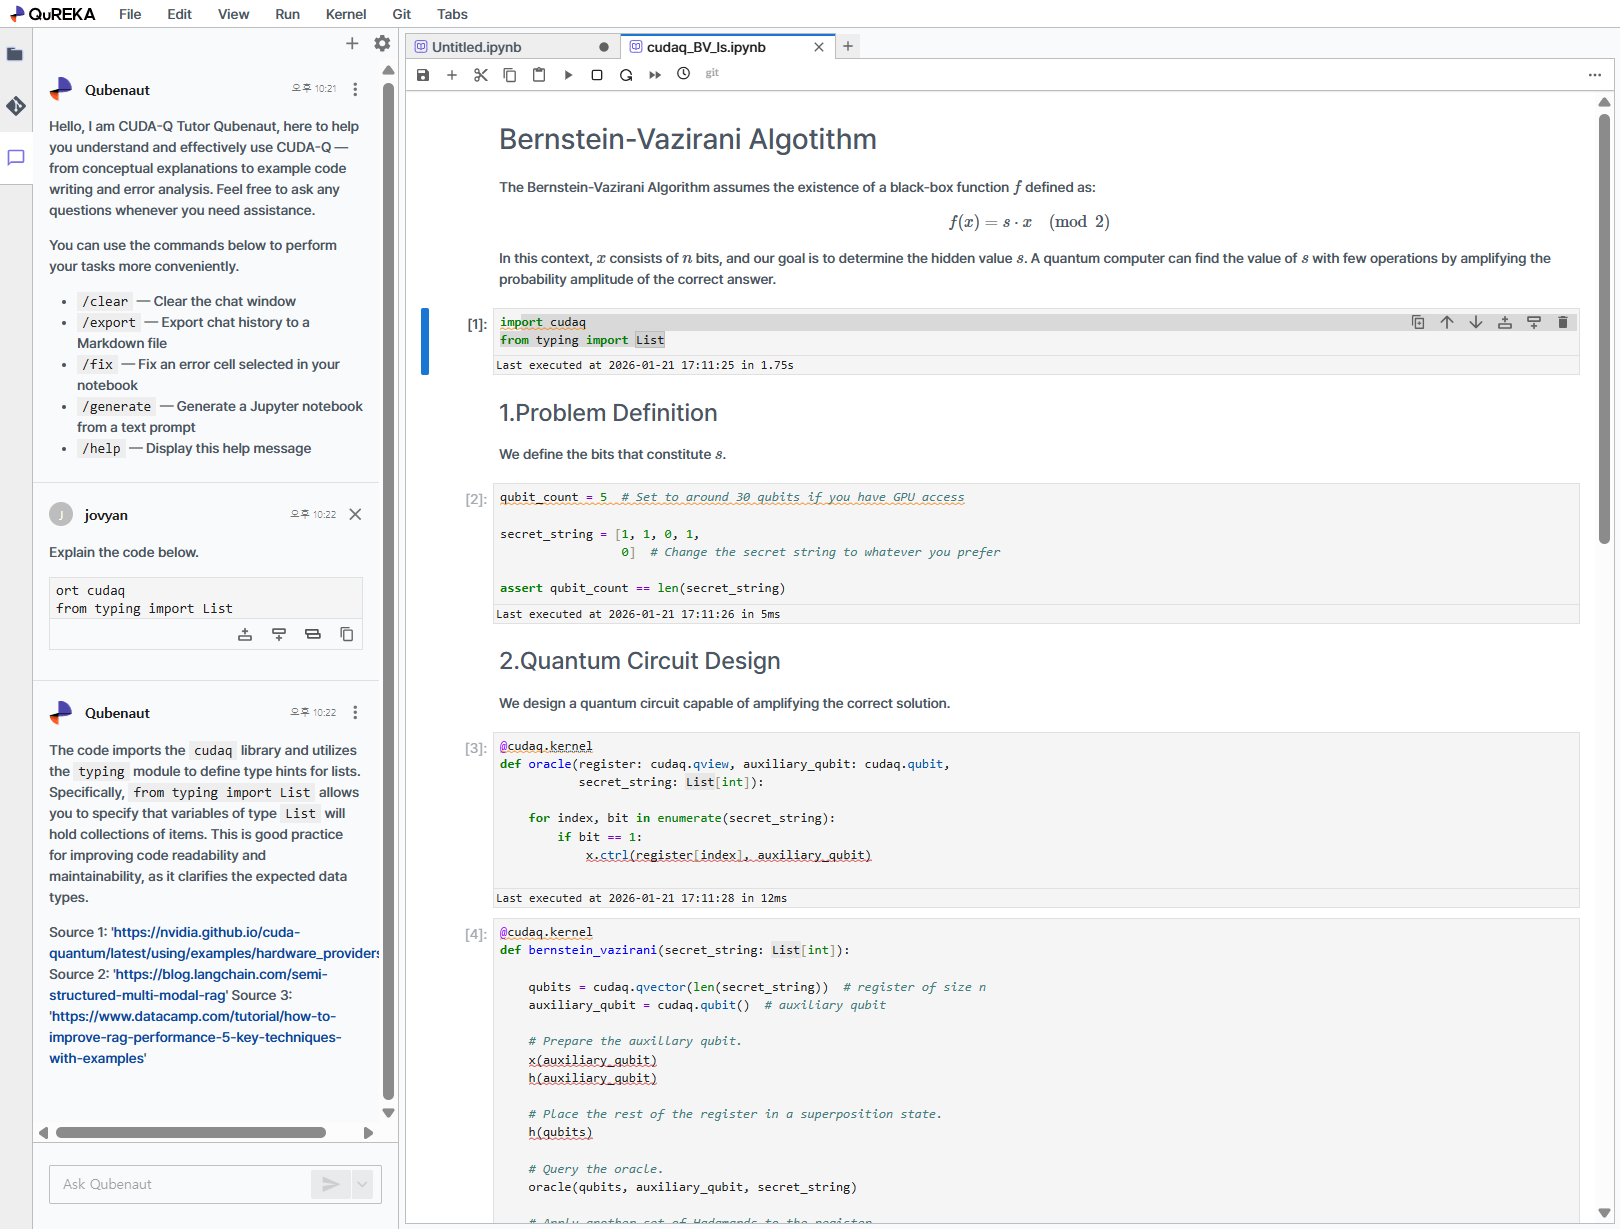
All Quantum Servers on QuREKA provide an optimized environment with NVIDIA CUDA-Q pre-installed. You can immediately begin developing CUDA-Q based quantum algorithms through Jupyter Notebook without any additional framework installation.
2. Writing a Quantum Circuit
QuREKA provides DGX infrastructure optimized for NVIDIA CUDA-Q, so we highly recommend developing with CUDA-Q. The following example demonstrates creating a GHZ State using three qubits.
[Code Cell]
Python
import cudaq

@cudaq.kernel
def ghz(numQubits: int):
    # Create a qubit vector
    qubits = cudaq.qvector(numQubits)

    # Apply Hadamard gate to the first qubit (creating superposition)
    h(qubits.front())

    # Create entanglement between qubits using controlled-X (CNOT) gates
    x.ctrl(qubits[0], qubits[1])
    x.ctrl(qubits[1], qubits[2])

    # Measure all qubits
    mz(qubits)

# Verify circuit validity via simulation before submitting the actual job
sample_result = cudaq.sample(ghz, 3)
print(sample_result)
[Output]
{ 000:123 001:158 010:121 011:107 100:107 101:115 110:124 111:145 }Note: The output shows measurement counts for a total of 8 states from 000 to 111. Due to the probabilistic nature (randomness) of quantum computing, results may vary with each execution.
3. Submitting a Quantum Job
Submit your written circuit to an actual quantum resource (Backend) for execution. You can select various backends provided by QuREKA using the cudaq.set_target function. For authentication, you will need the API Key issued during the service preparation stage.
The following example shows how to set the target to the MIMIQ simulator and submit a job.
[Code Cell]
Python
# Configure execution environment and authentication
device = "qube.mimiq"
api_key = "TYPE_YOUR_API_KEY" # Enter the API key issued from your Dashboard

# Set QuREKA quantum backend target
cudaq.set_target("sdt", device=device, api_key=api_key)

# Submit quantum job and receive results
result = cudaq.sample(ghz, 3)
print(result)
4. Monitoring Your Job
You can monitor the status and history of your submitted quantum jobs through the following paths:
- 'TASK' Tab (Right Side): Monitor the status of your currently submitted job in real-time within the right panel of the Quantum Server (Jupyter Notebook).
- 'Quantum Jobs' Menu (Console): View detailed results and statistics for all jobs, including past execution history, in the [Quantum Jobs] menu of the main QuREKA console.

QuREKA Interfaces
Understanding QuREKA System Structure
All information and resources on the QuREKA platform are managed based on the Workspace.
- Workspace-Based Information: All menus in the left sidebar—including Dashboard, Quantum Server, and Quantum Jobs—display data specific to the currently selected workspace.
- Resource Isolation: Each workspace maintains its own independent API keys, credits, and quantum servers. When collaborating on different projects or with different teams, please ensure you switch to the appropriate workspace using the workspace switcher icon in the upper right corner before proceeding with your work.
Dashboard
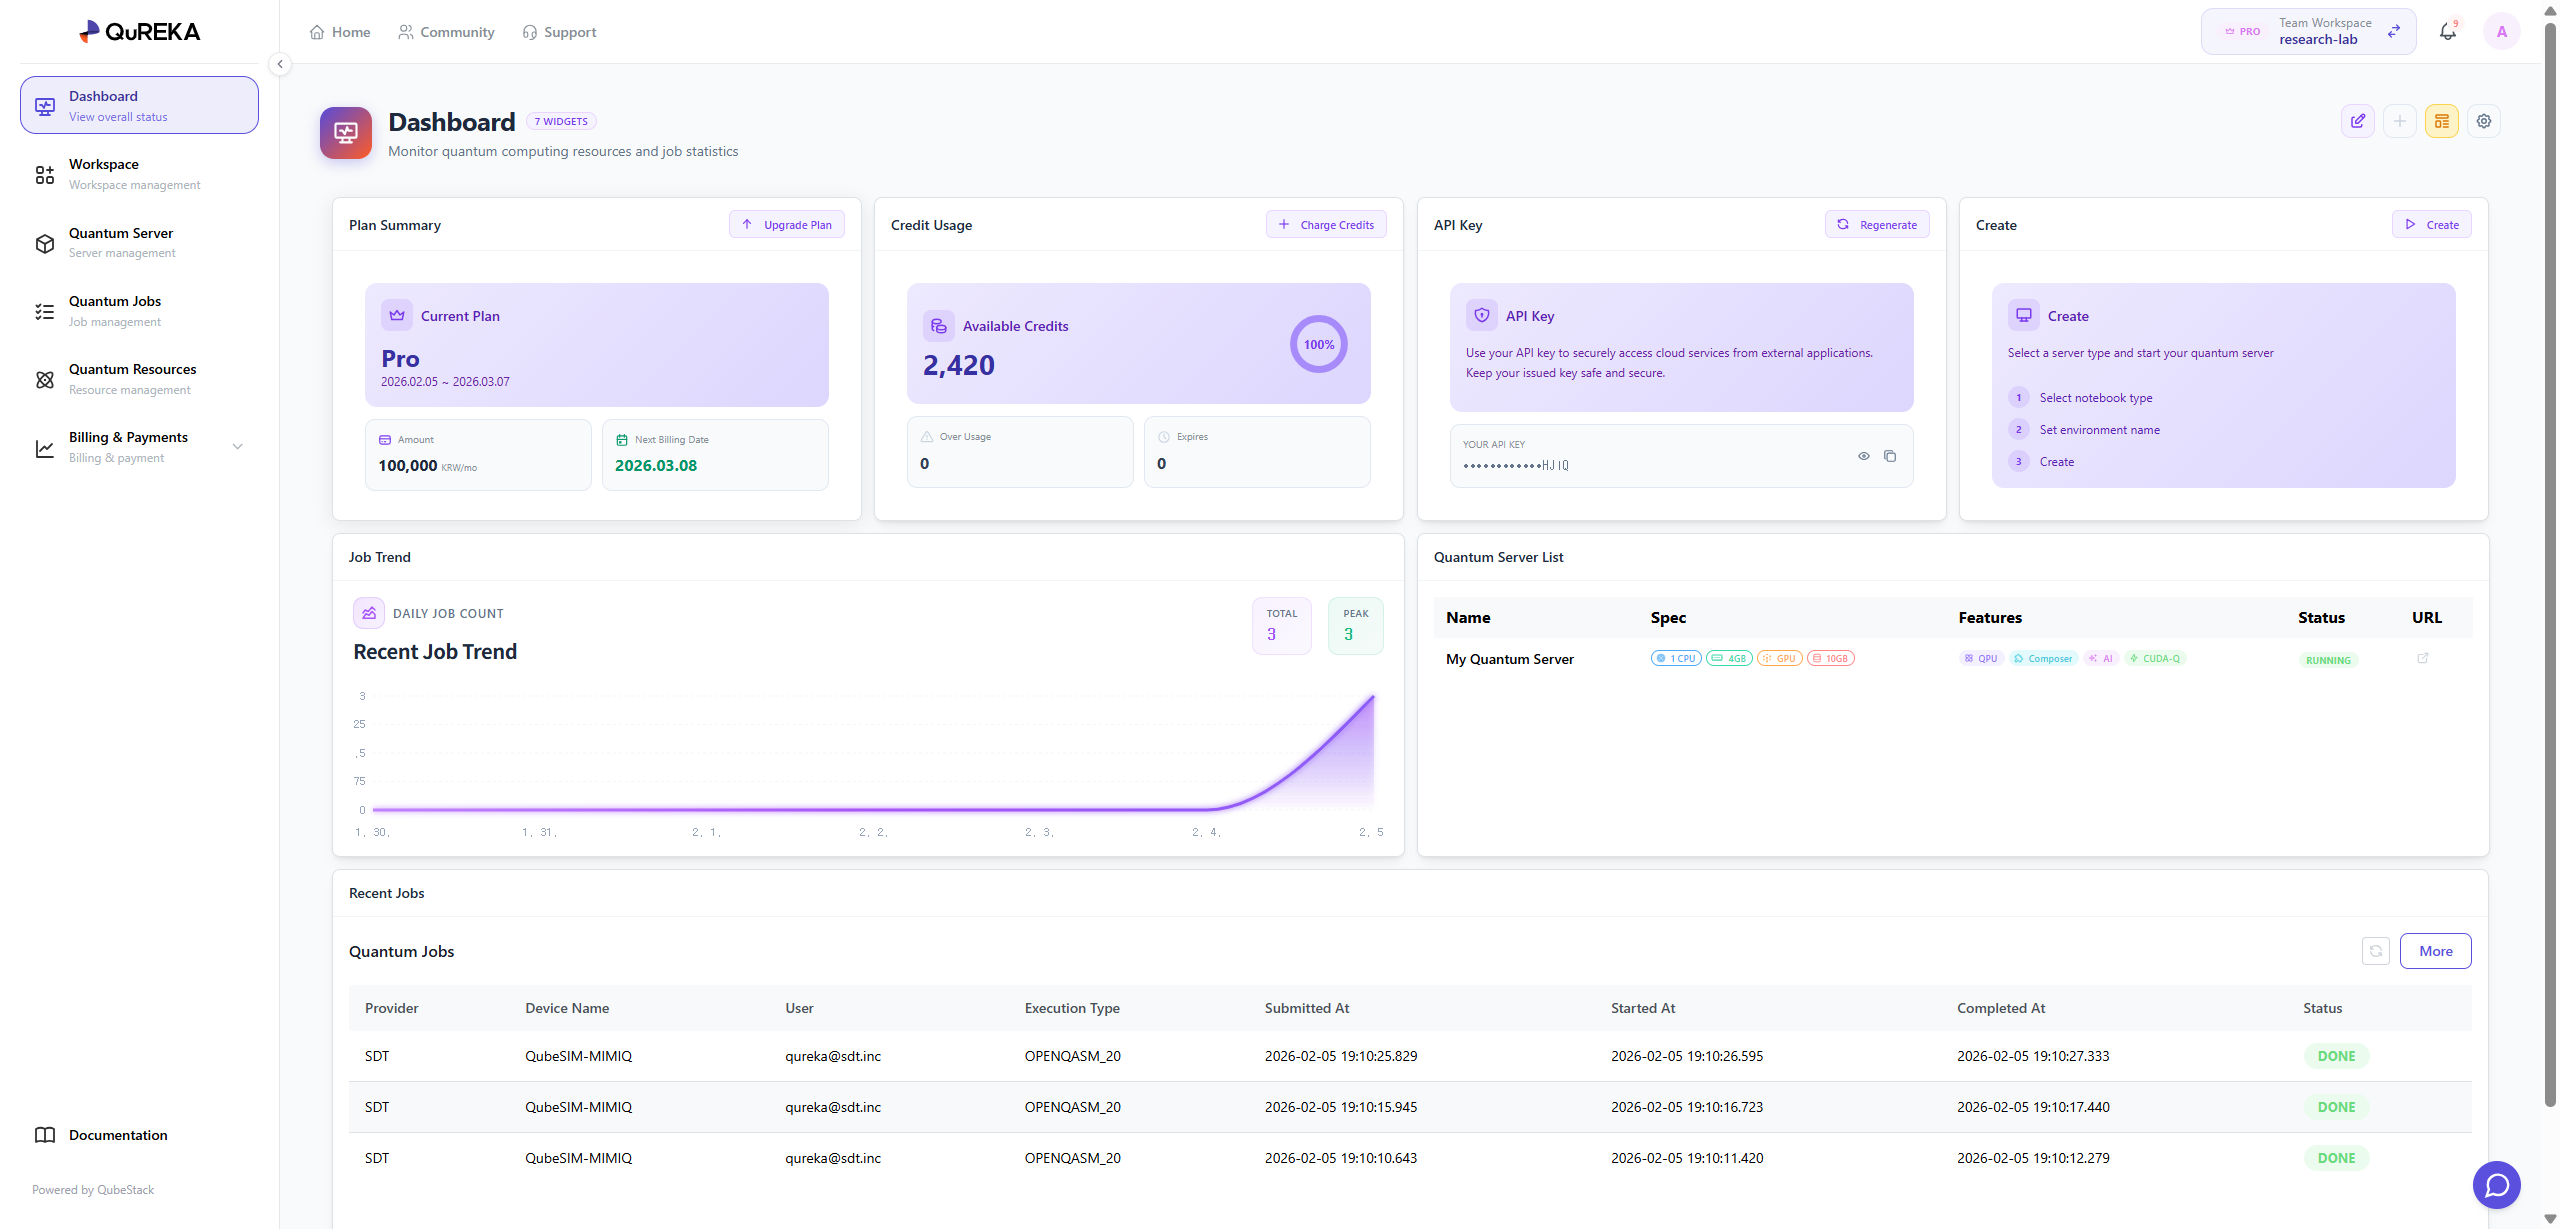
The Dashboard is the central hub of QuREKA, where you can manage Quantum Servers, handle subscription plans, and monitor job trends and lists at a glance.
By using the configuration button on the upper right, users can customize the dashboard with their preferred components (widgets). Each item’s position and size can be freely adjusted to create an optimized layout tailored to the user's needs.
Key Dashboard Components
Plan Summary
-
View and manage the current subscription plan of the workspace.
- For security and billing management, only the Workspace Owner has the authority to change the subscription plan.
Credits Usage
-
Monitor the remaining credits and current usage status of the workspace in real-time to manage your budget effectively.
API Key Management
-
Manage the unique API key assigned to each individual within the workspace.
-
This key is mandatory for user authentication when submitting quantum jobs. Reissuance features are provided for security in case of key exposure.
Quantum Server
-
Manage dedicated computational resources for quantum algorithm development.
-
You can immediately create a Quantum Server via the [Create] button. Once created, you can start developing in the following environments:
-
Notebook: A code-based development environment powered by JupyterLab.
-
Composer: A GUI-based environment for designing quantum circuits using drag-and-drop functionality.
-
No-code: A simplified development environment that requires no coding (scheduled for a future update).
Note: The available types and specifications (vCPU, RAM, GPU, etc.) of Quantum Servers depend on your current Subscription Plan.
-
Job Trend
-
Provides a visual representation of the daily trend for quantum jobs executed within the workspace, helping users understand their usage patterns.
Recent Jobs
-
Quickly check the list and status of the most recent jobs in the workspace.
-
Click the [More] button to navigate to the Quantum Jobs tab for a detailed history of all tasks.
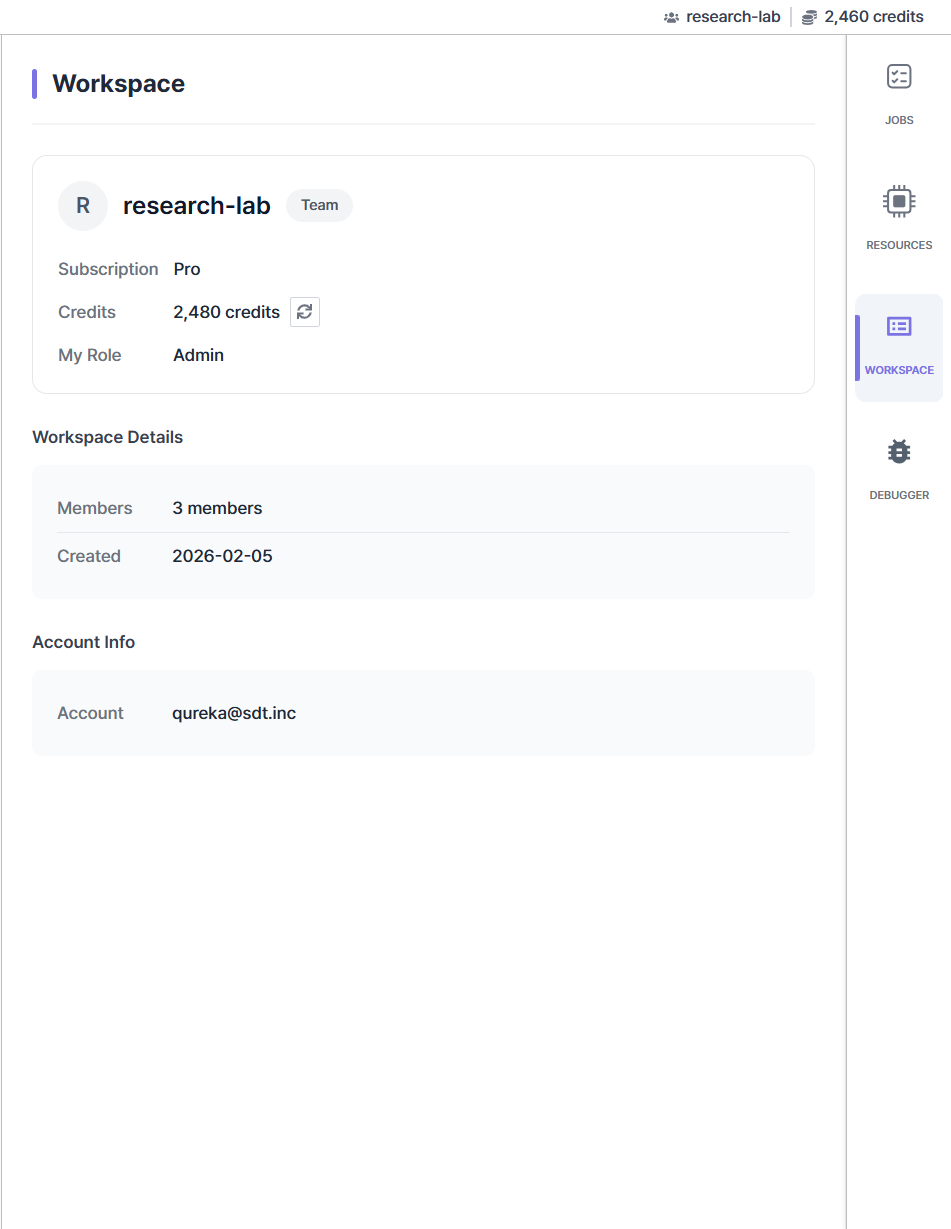
Workspace
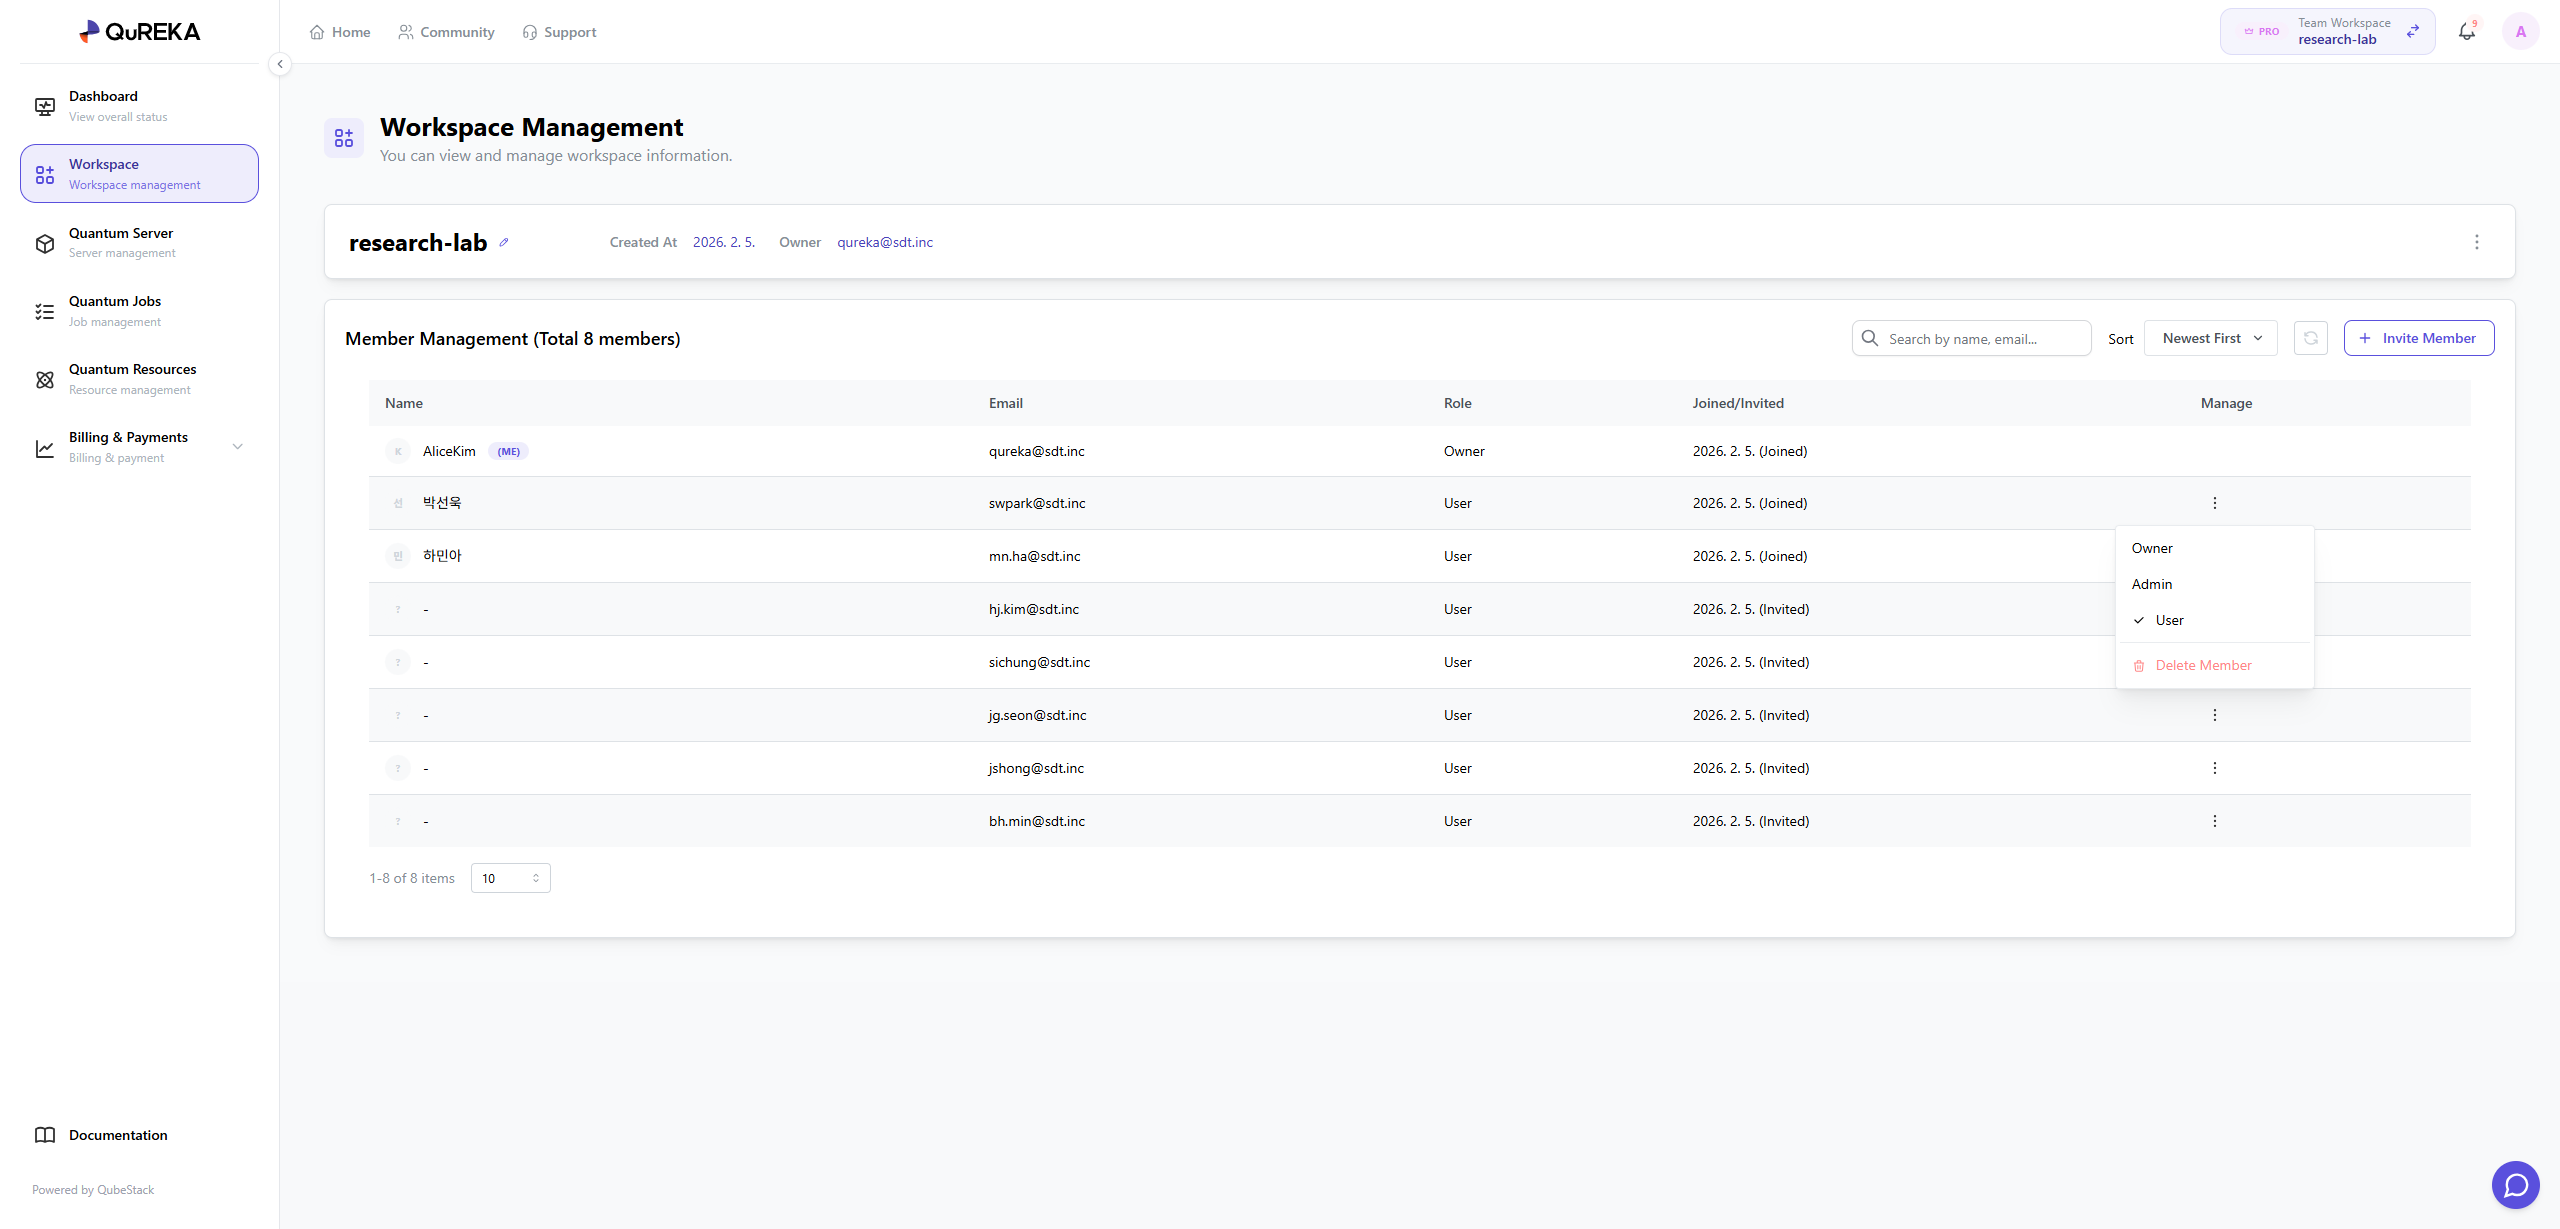
A Workspace is the fundamental unit for team collaboration and resource management. On the Workspace Management page, you can control basic information about the current workspace and manage participating members.
Workspace Information
This section provides essential details about the workspace. You can check the workspace name, creation date, and the current Owner.
Member Management
This feature allows for the systematic management of users within the workspace. Administrators can freely adjust the member composition and permissions according to the nature of the project.
-
Inviting and Verifying Members: You can invite new team members to collaborate by entering their email addresses. Through the invitation menu, you can check the list of sent invitations and monitor the real-time status of members pending acceptance.
-
User Permission Management: You can set or change permissions for each member belonging to the workspace. This allows you to control the scope of resource access according to each member's specific role.
-
Member Removal: You can remove members with whom collaboration is no longer required. Upon removal, all access rights to the resources within that workspace are immediately revoked.
Quantum Server
The Quantum Server page allows you to manage dedicated computational resources for developing and simulating quantum algorithms. You can create servers, control their operational status, and access the development environment here.
1. Creating a Quantum Server
To establish a new development environment, you must first create a Quantum Server.
-
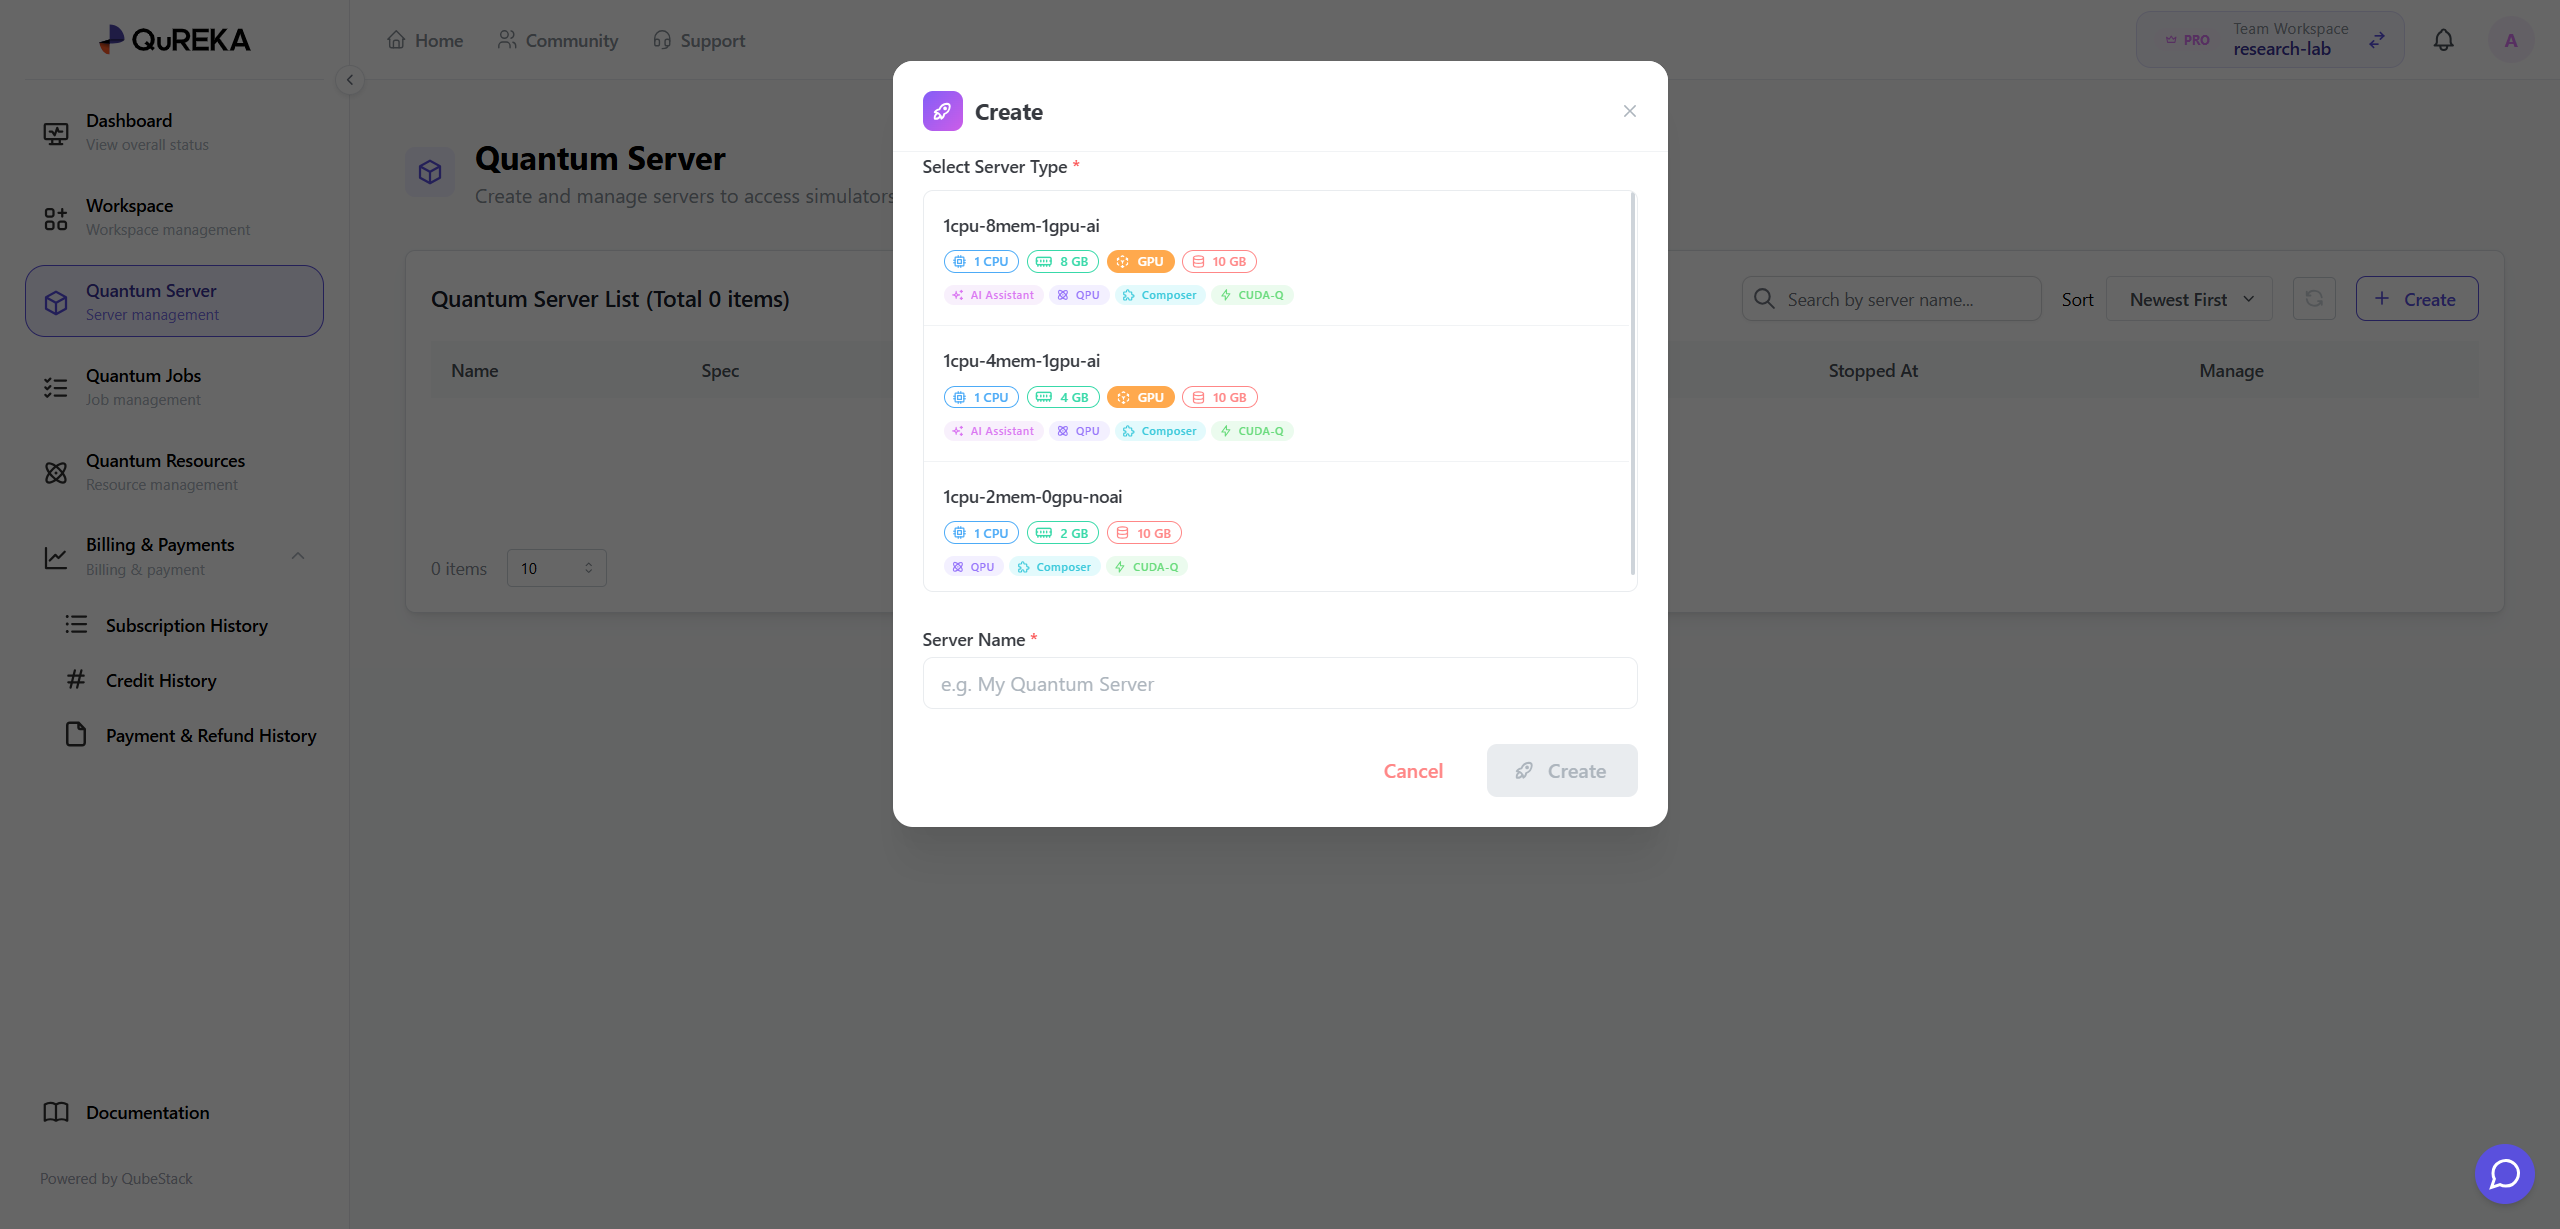
Creation Method: Click the [+ Create] button at the upper right of the page.
-
Select Specifications (SPEC): First, select the server specifications (SPEC) you wish to use.
-
Note: The available server types vary depending on your current Subscription Plan.
-
-
Enter Name: Input a name for the server you are creating.
-
Credit Pre-deduction: Upon accessing the Quantum Server after it starts, credits will be pre-deducted based on the server specifications. You can preview the amount of credits to be deducted on the screen during the creation process.
2. Quantum Server List
Displays a list of all created Quantum Servers along with their detailed information.
SPEC (Server Specifications)
Hardware resource information based on the selected plan.
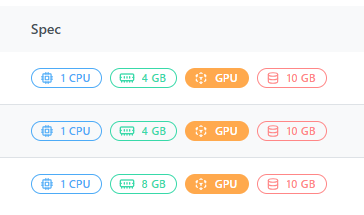
-
CPU: The Central Processing Unit that handles classical computations and system processes for quantum circuits.
-
RAM: Memory space required for storing data during simulations. Higher qubit counts require larger RAM capacity.
-
GPU: Enables GPU resources for high-performance simulations. It significantly accelerates computational speed via platforms like CUDA-Q.
-
Storage: Physical storage space for saving code files, datasets, and job results.
Features
Core features and technology stacks supported by the server.
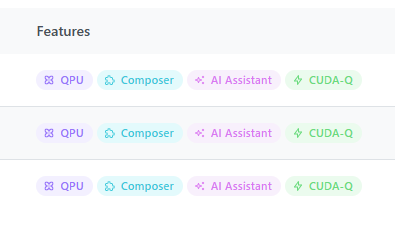
-
QPU: Supports connectivity to submit and execute jobs on actual Quantum Processing Units.
-
Composer: Provides a GUI-based environment for designing quantum circuits using drag-and-drop functionality.
-
AI Assistant: Grants access to AI-powered assistance for code writing and algorithm development.
-
CUDA-Q: Features NVIDIA’s high-performance quantum computing platform pre-installed for an optimized environment.
Status
-
RUNNING: The server is currently active, and the development environment is accessible.
-
STOPPED: The server operation is temporarily paused.
Manage
Control the server using the icons on the right side of the list.
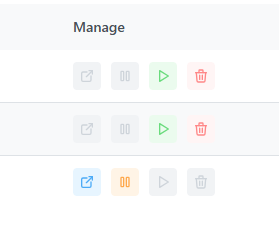
-
Open: Launches and accesses the QubePad development environment.
-
Stop: Stops the running server. This is recommended when not in use to prevent unnecessary resource consumption.
-
Restart: Resumes a stopped server and switches it back to the running state.
-
Delete: Removes the server. Please proceed with caution, as all data within the server will be permanently lost upon deletion.
Quantum Jobs
Here is the English translation for the Quantum Jobs section:
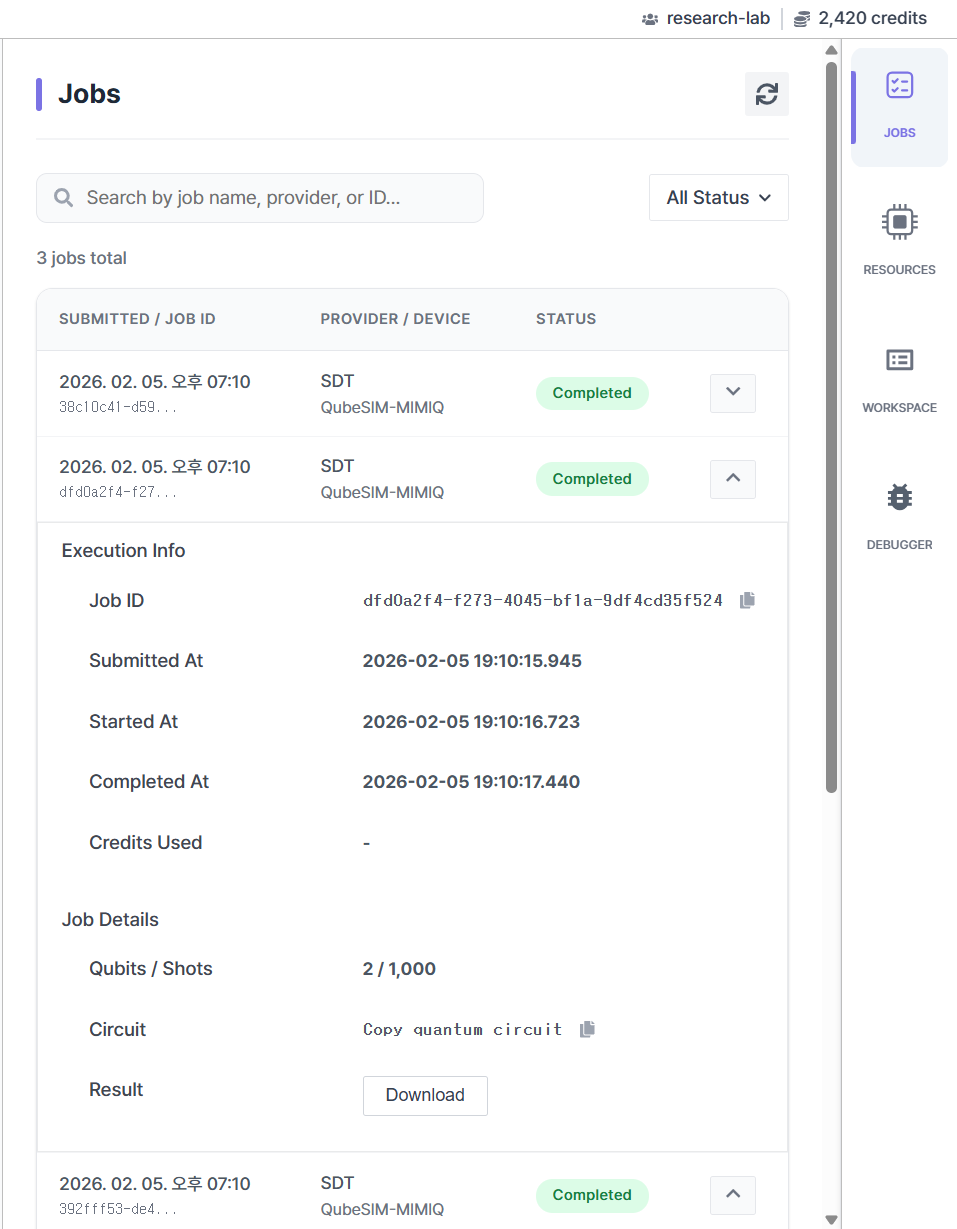
The Quantum Jobs page is where you can monitor the quantum jobs executed within your workspace. It allows you to track the progress of all submitted tasks and conduct a detailed analysis of the results for completed jobs.
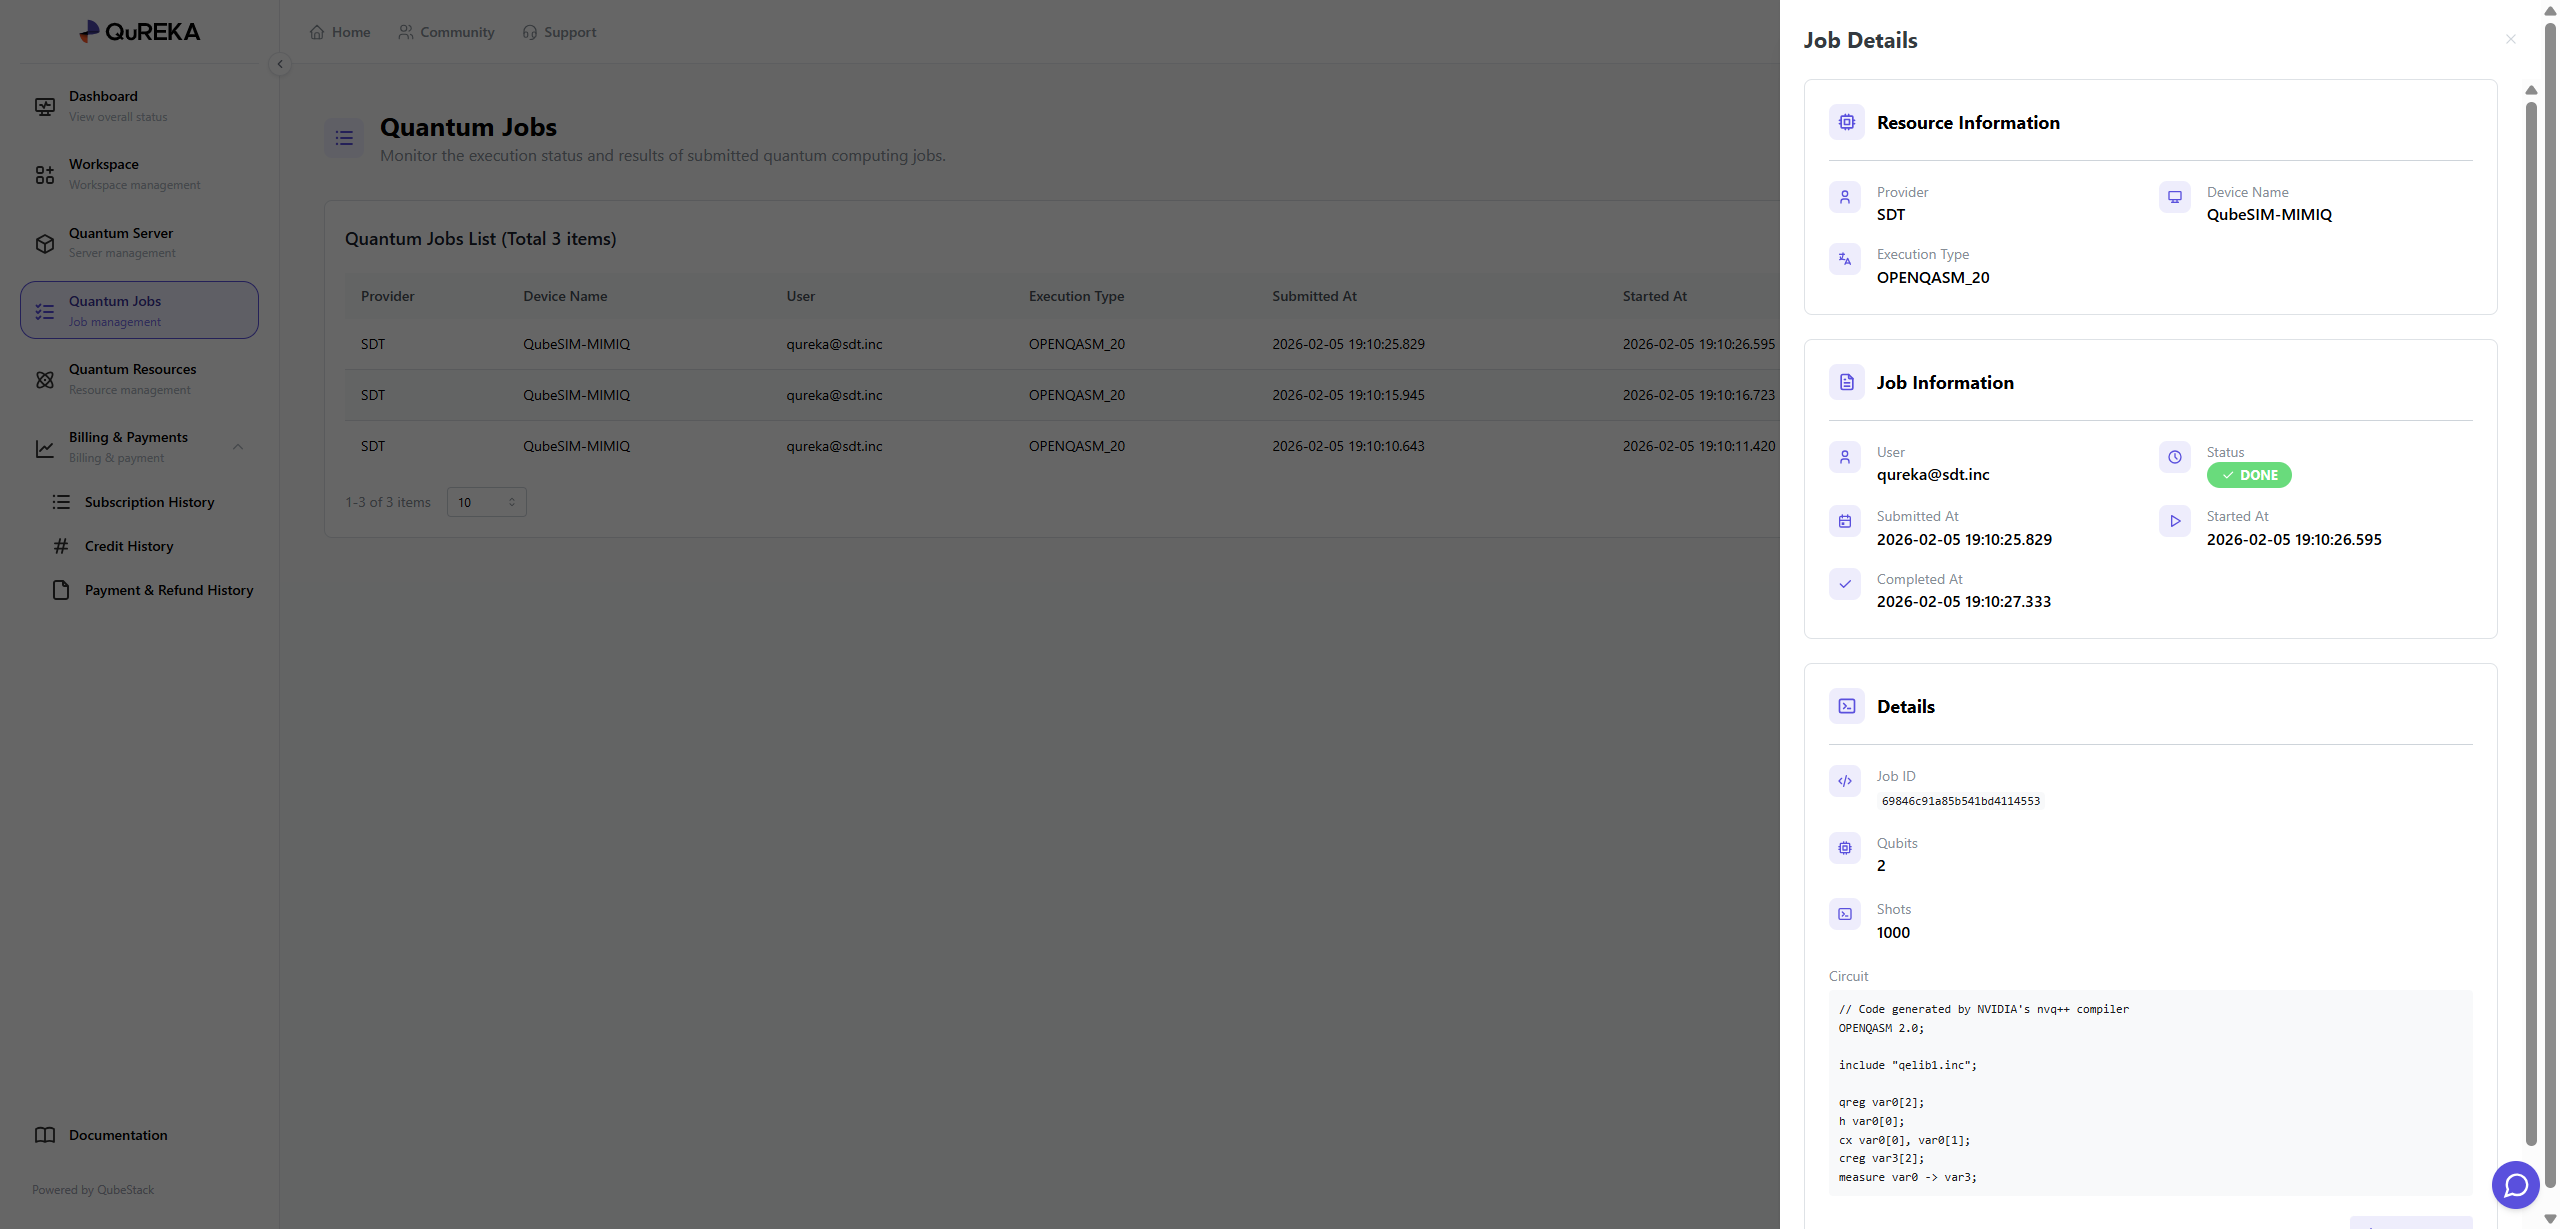
1. Quantum Jobs List
Quantum jobs executed in the workspace are identified and distinguished by the following information:
-
Provider: The provider of the quantum resources.
-
Device Name: The name of the hardware or simulator used to execute the job.
-
User: The user who submitted the job.
-
Execution Type: The specific execution type of the job.
-
Submitted At: The date and time the job was submitted.
-
Started At: The date and time the job execution began.
2. Job Details
By selecting a specific job from the list, you can view more in-depth information via the details panel on the right:
-
Status: Displays the current status of the job (e.g., DONE, RUNNING, PENDING, FAILED).
-
Completed At: The date and time the job was finally completed.
-
Job ID: The unique identification number for the task.
-
Qubits: The number of qubits utilized in the circuit.
-
Shots: The number of times the circuit was repeatedly executed.
-
Circuit: Allows you to directly review the submitted quantum circuit code.
3. Result Verification and Download
Users can review the results of completed (DONE) jobs on the details screen and download the data if necessary.
Quantum Resources
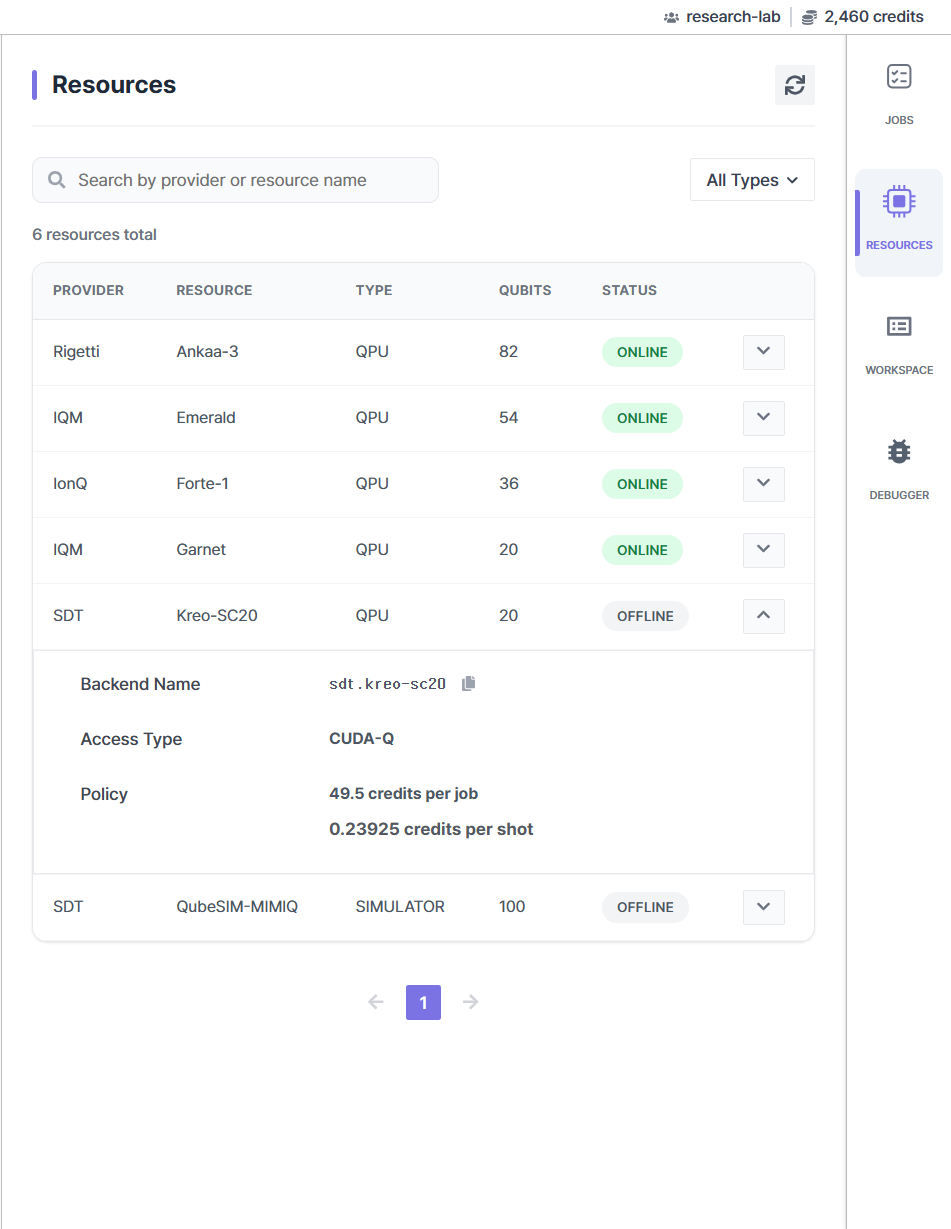
The Quantum Resources page is where you can check the real-time status and detailed specifications of various quantum computers (QPUs) and simulators provided by QuREKA, as well as manage access permissions for each member.
1. Quantum Resources List
Key information for all currently available quantum resources is displayed in a list format:
-
Provider: The supplier providing the quantum resources (e.g., Rigetti, IQM, IonQ, SDT, etc.).
-
Device Name: The unique name of the specific device.
-
Status: Indicates the current connection status of the resource.
-
ONLINE: The resource is in a normal state, allowing for job submission and execution.
-
OFFLINE: The resource is currently unavailable due to maintenance or other reasons.
-
-
Type: Distinguishes the type of resource.
-
QPU: Actual quantum hardware that performs computations using physical quantum elements.
-
SIMULATOR: A virtual execution environment that uses high-performance computing (HPC) resources to mathematically calculate the results of quantum algorithms instead of using an actual quantum computer.
-
-
Qubits: The total number of qubits available on the device.
-
Permission: Shows the current access permission status set for the resource.
2. Resource Management
Administrators (Admins) can directly control the resource access permissions visible to workspace members. These can be configured via the More (⋮) icon on the right side of the list:
-
Admin Only: Only users with administrator privileges can view the resource and submit jobs.
-
User Accessible: General workspace members can also view the resource in the list and use it to execute their jobs.
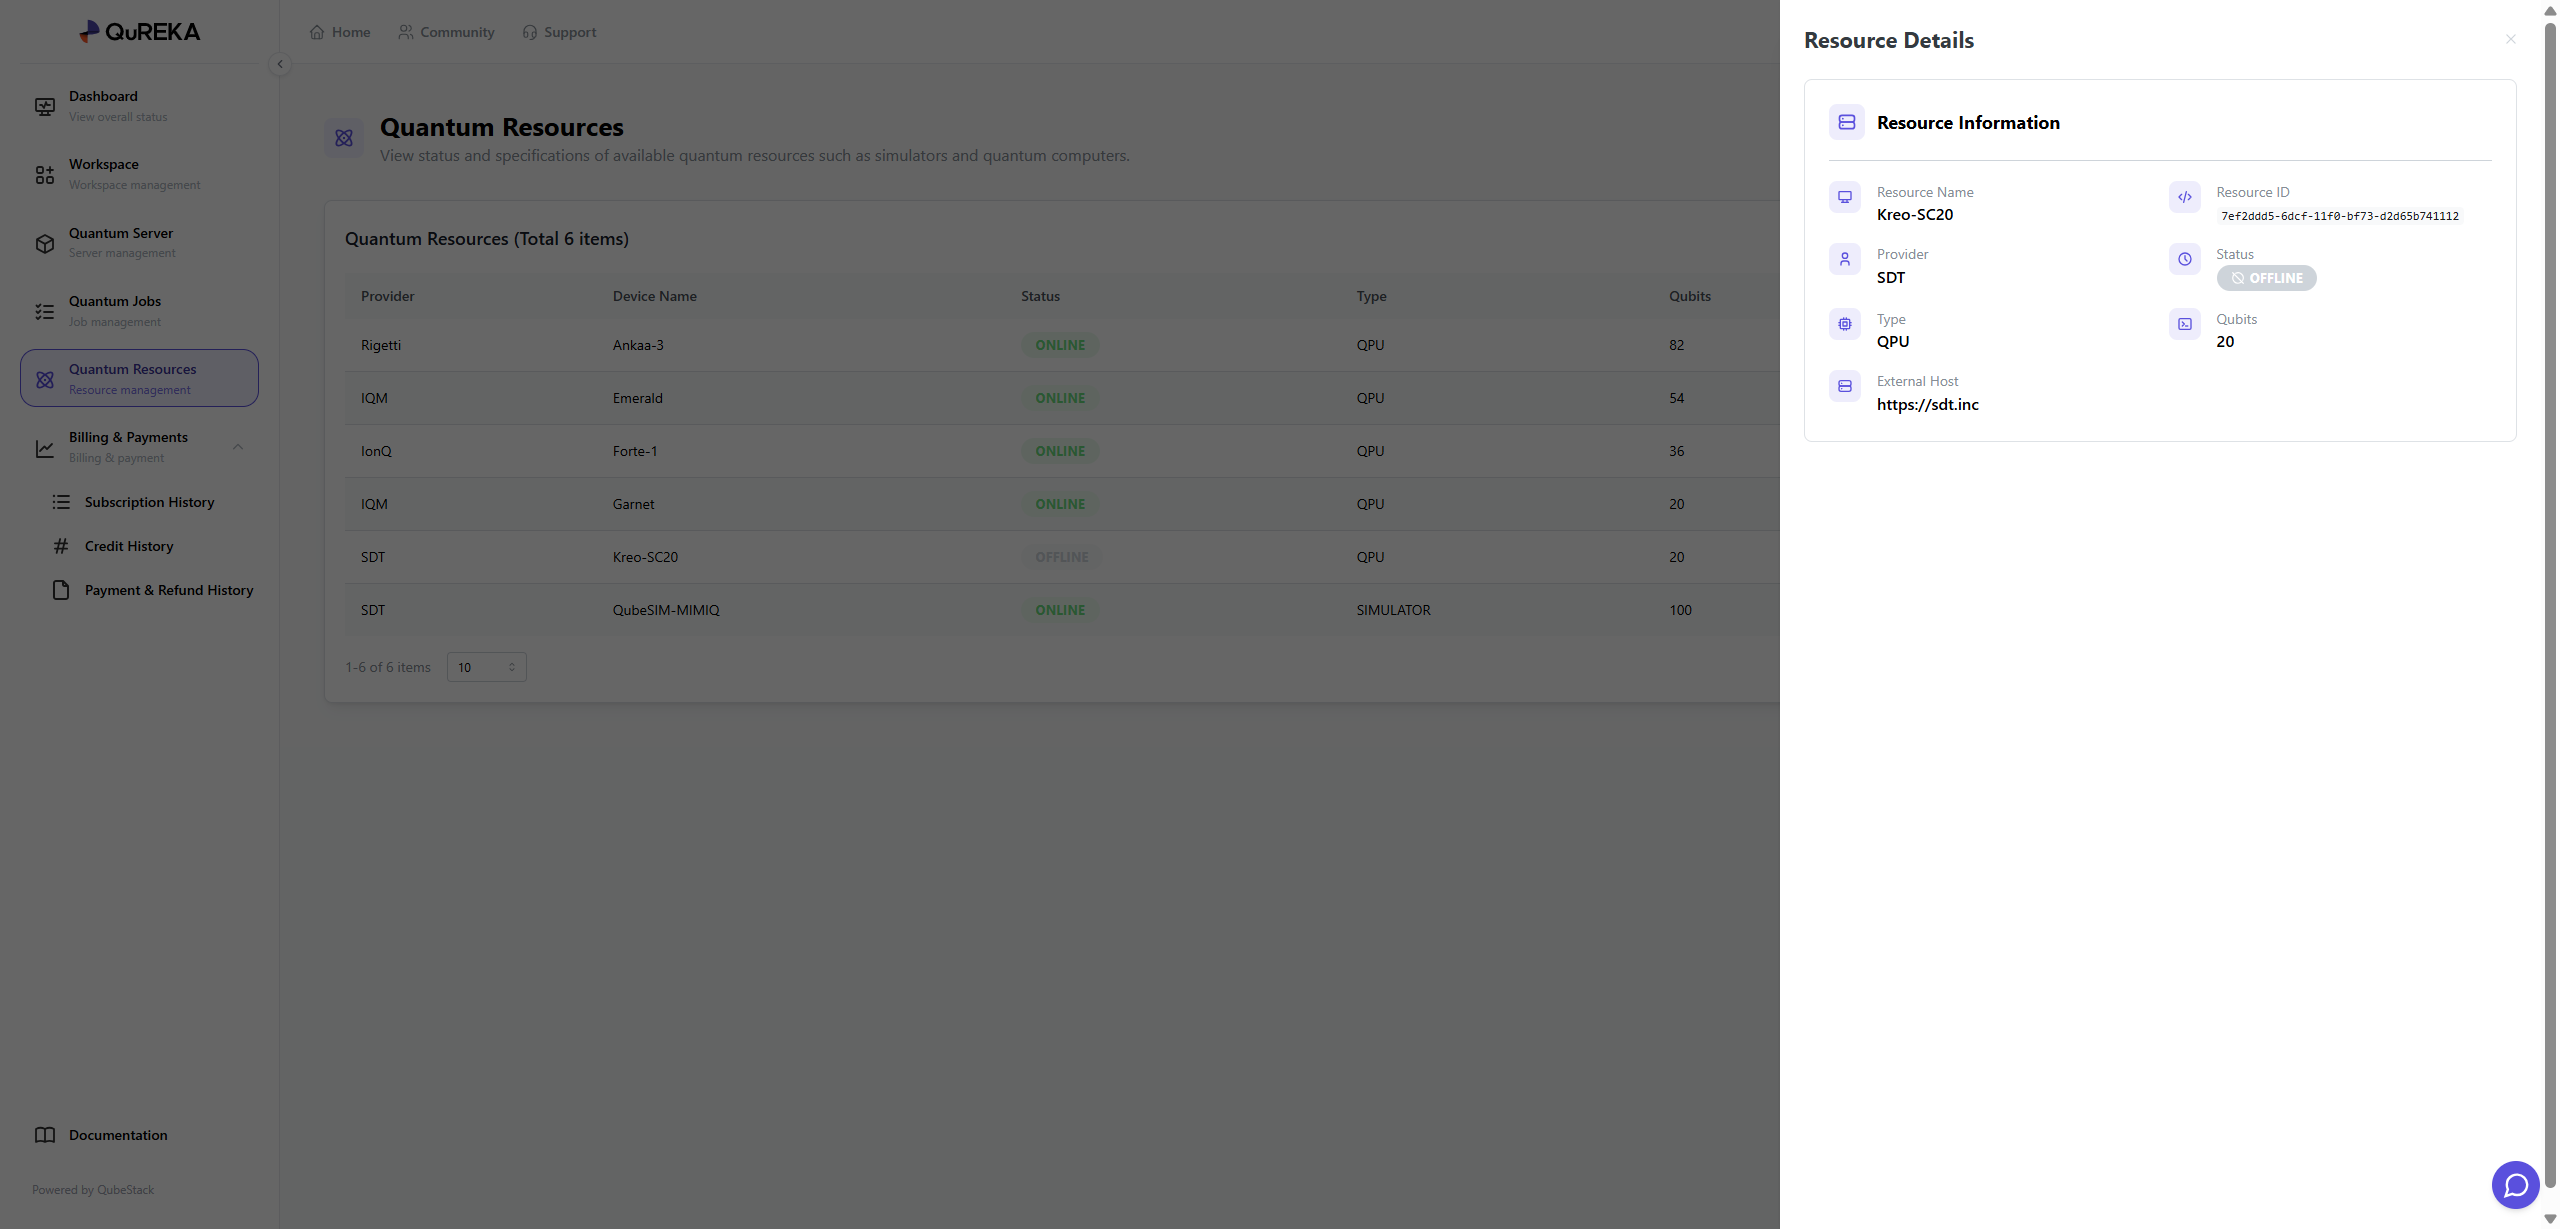
3. Resource Details
By clicking on a specific resource, a details panel appears on the right where you can find more in-depth technical information:
-
Resource ID: A unique ID used to identify the resource within the system.
-
Status: Provides a detailed view of the resource's current operational status.
-
External Host: Information regarding the external address where the resource is hosted.
Billing & Payments
This section is for managing the workspace's subscription plans, credits, and payment methods. All payment-related information is strictly managed for security.
1. Subscription History
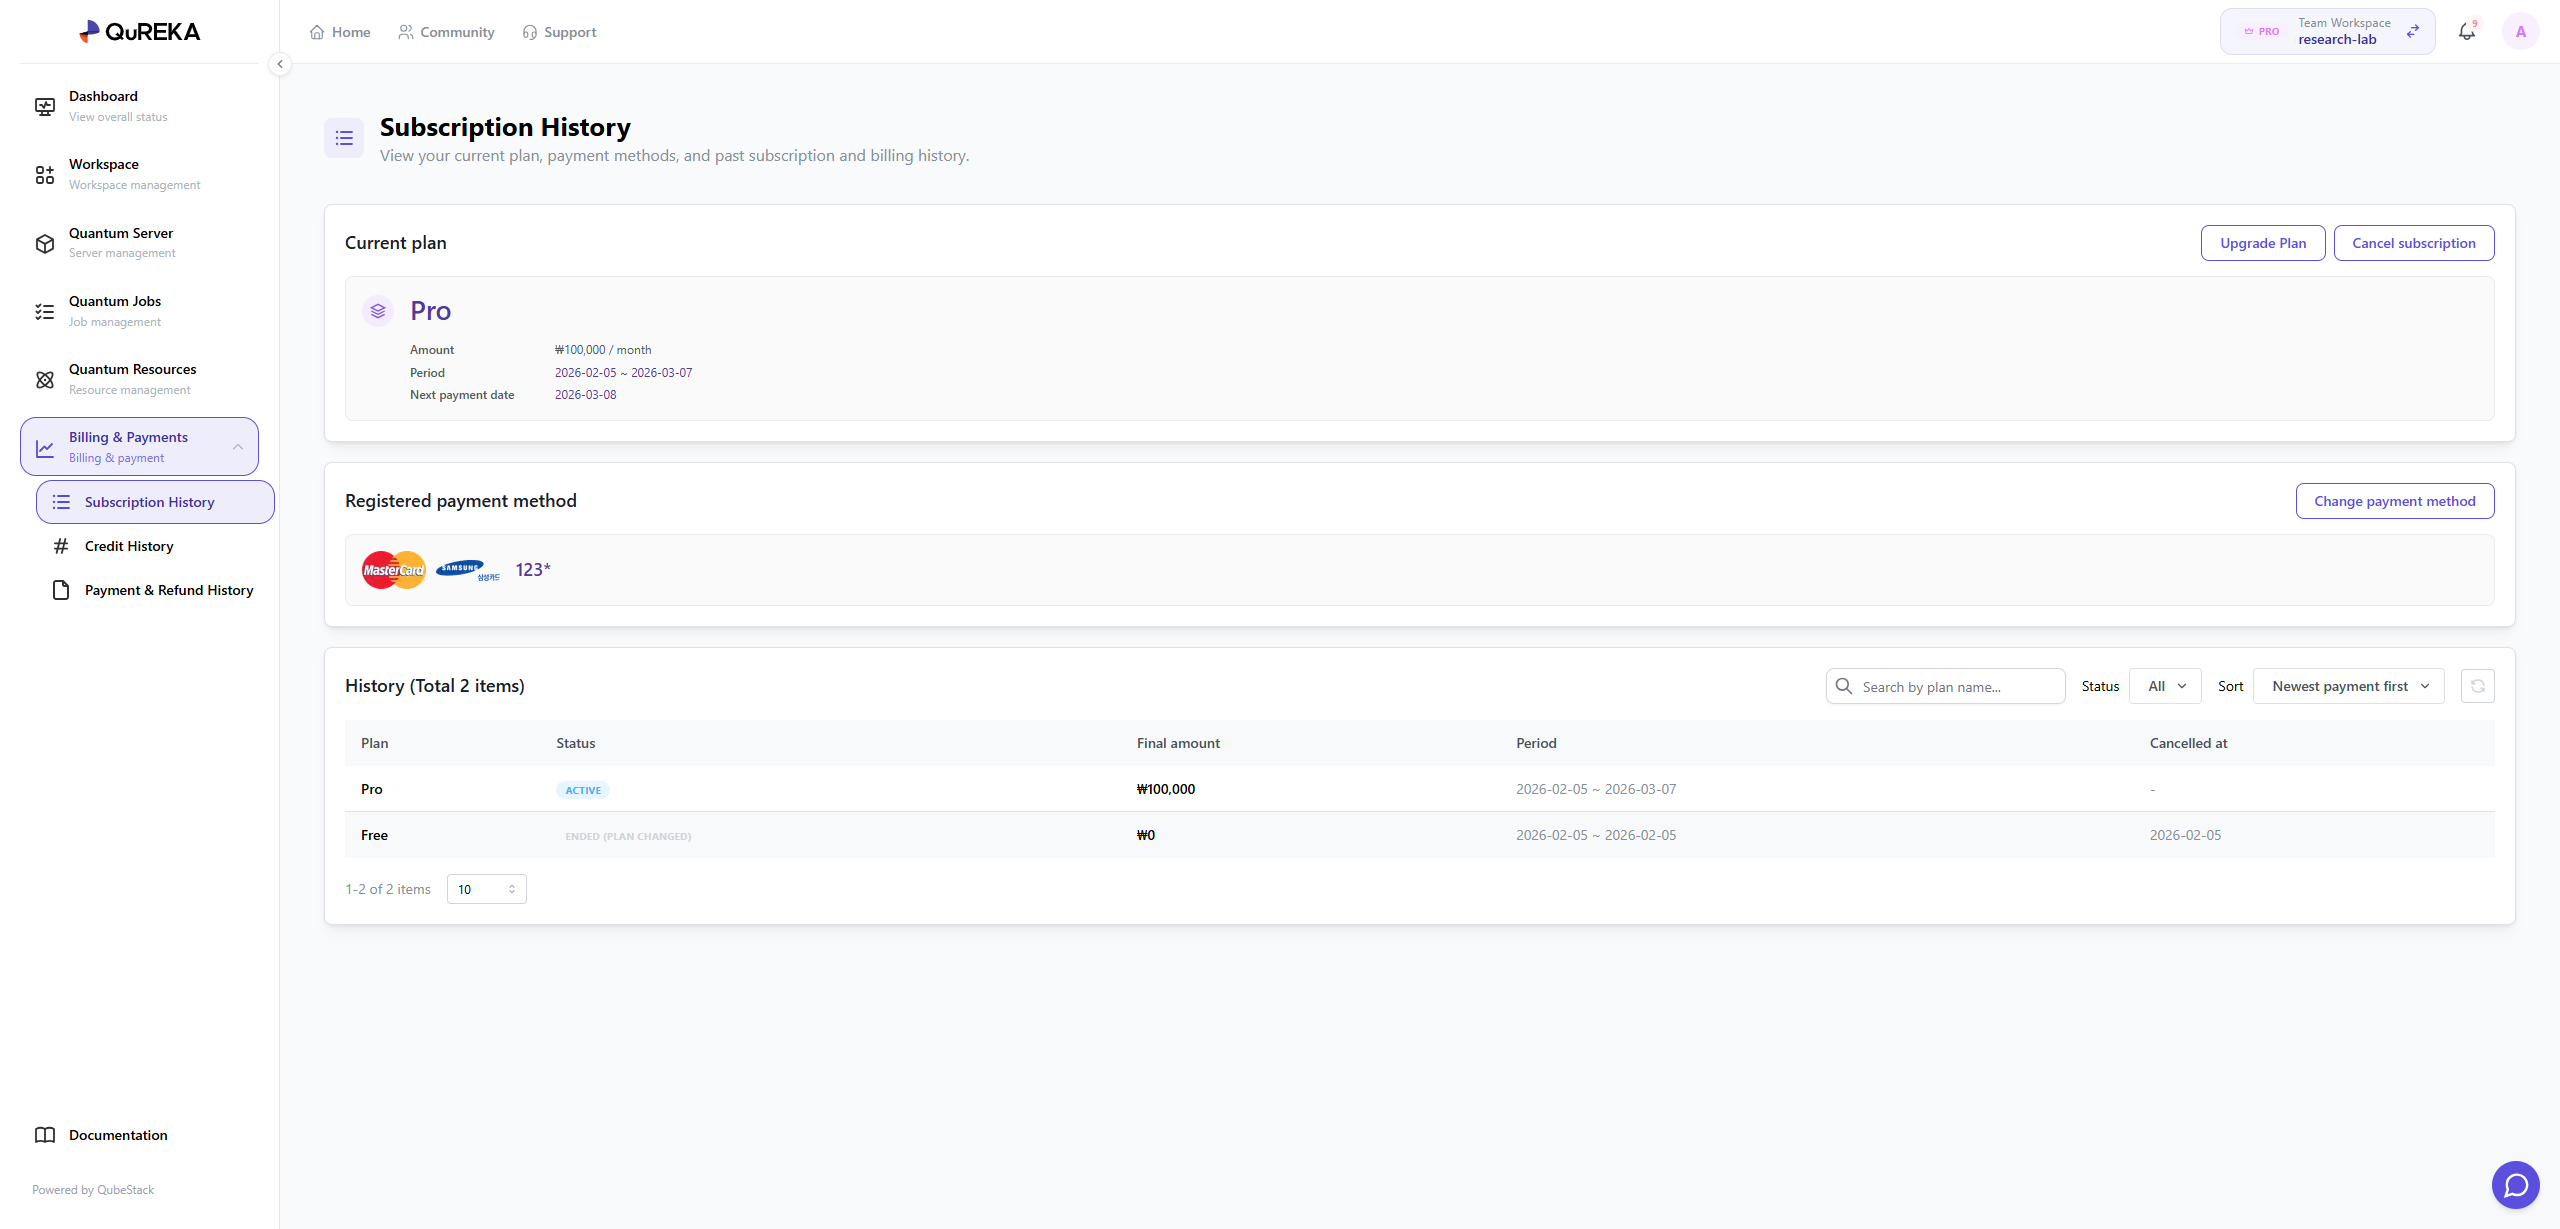
-
Current Plan: You can check the subscription plan currently in use and, if necessary, upgrade to a higher plan or cancel the current subscription.
-
Registered Payment Method: You can register a payment method for recurring subscription payments.
-
Security Notice: Only the Workspace Owner can register or change payment methods; this area is not visible to other members.
-
-
History: You can review the past subscription payment history of the workspace. Subscriptions are automatically renewed every 30 days by default.
2. Credit History
Manage the status of credits used for quantum jobs and server usage within the workspace and track the consumption flow within the organization.
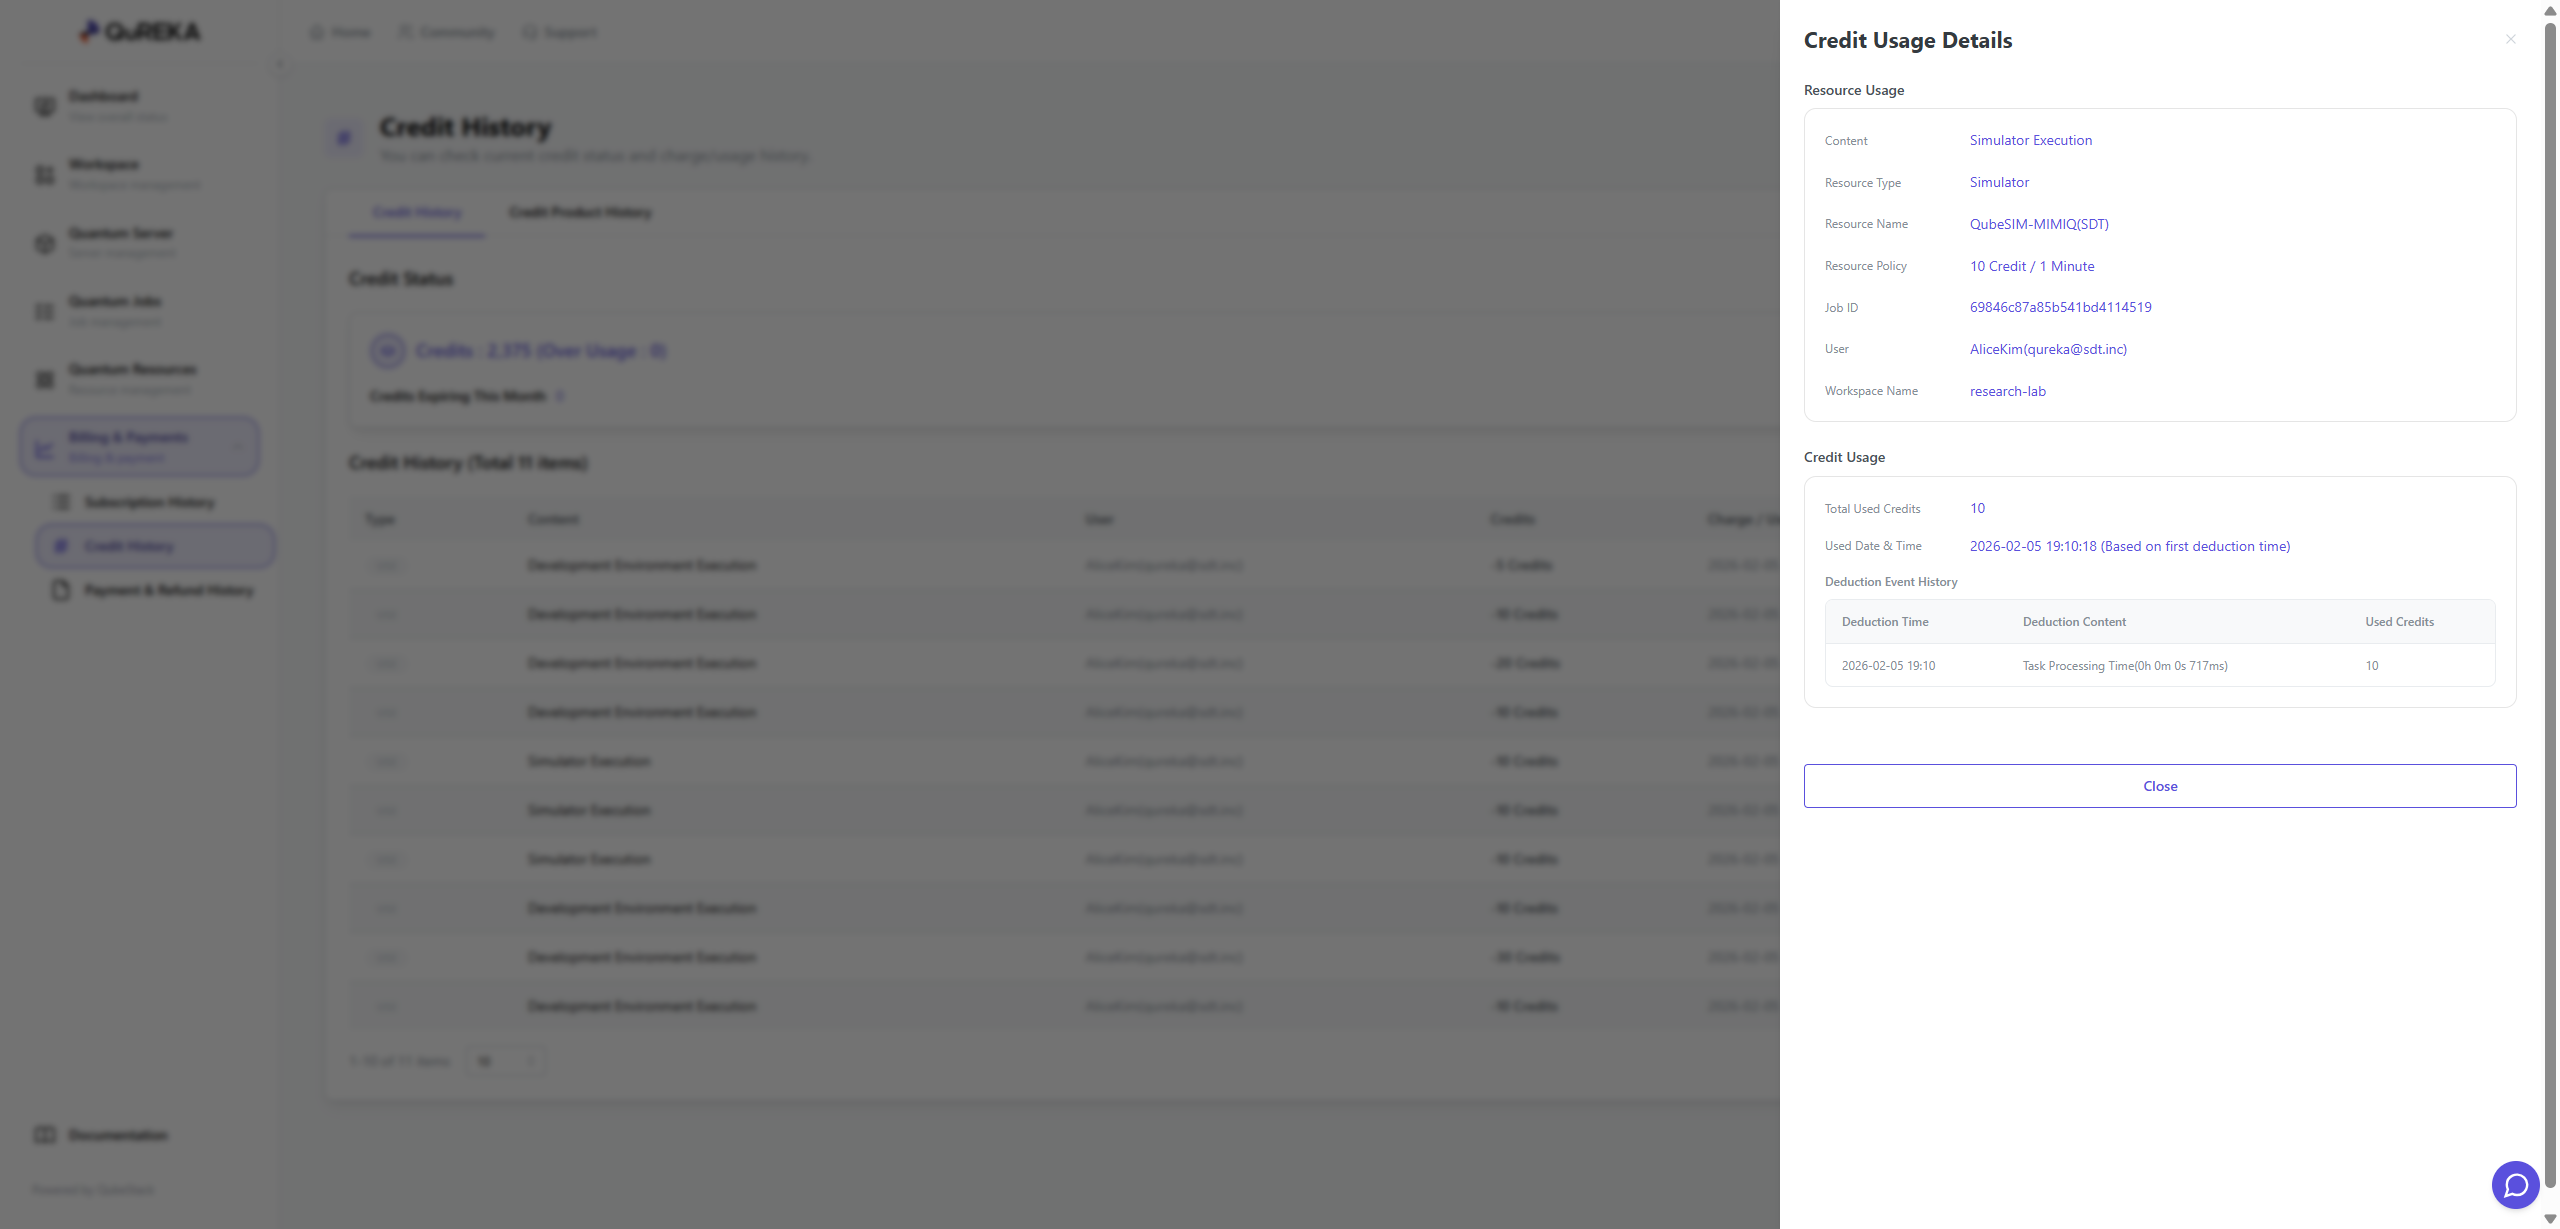
-
Credit Status: Check the remaining credit balance in real-time. If credits are insufficient, you can purchase additional credits via the [Purchase] button.
-
Credit History: You can view all records of credit recharges (purchases) and usage (deductions).
-
Organization Consumption Monitoring: It provides detailed logs of how all members within the workspace have consumed credits (e.g., quantum server usage, quantum job submissions), allowing for transparent cost management and tracking at the organizational level.
-
3. Payment & Refund History
Monitor all financial transaction records that occurred within the workspace.
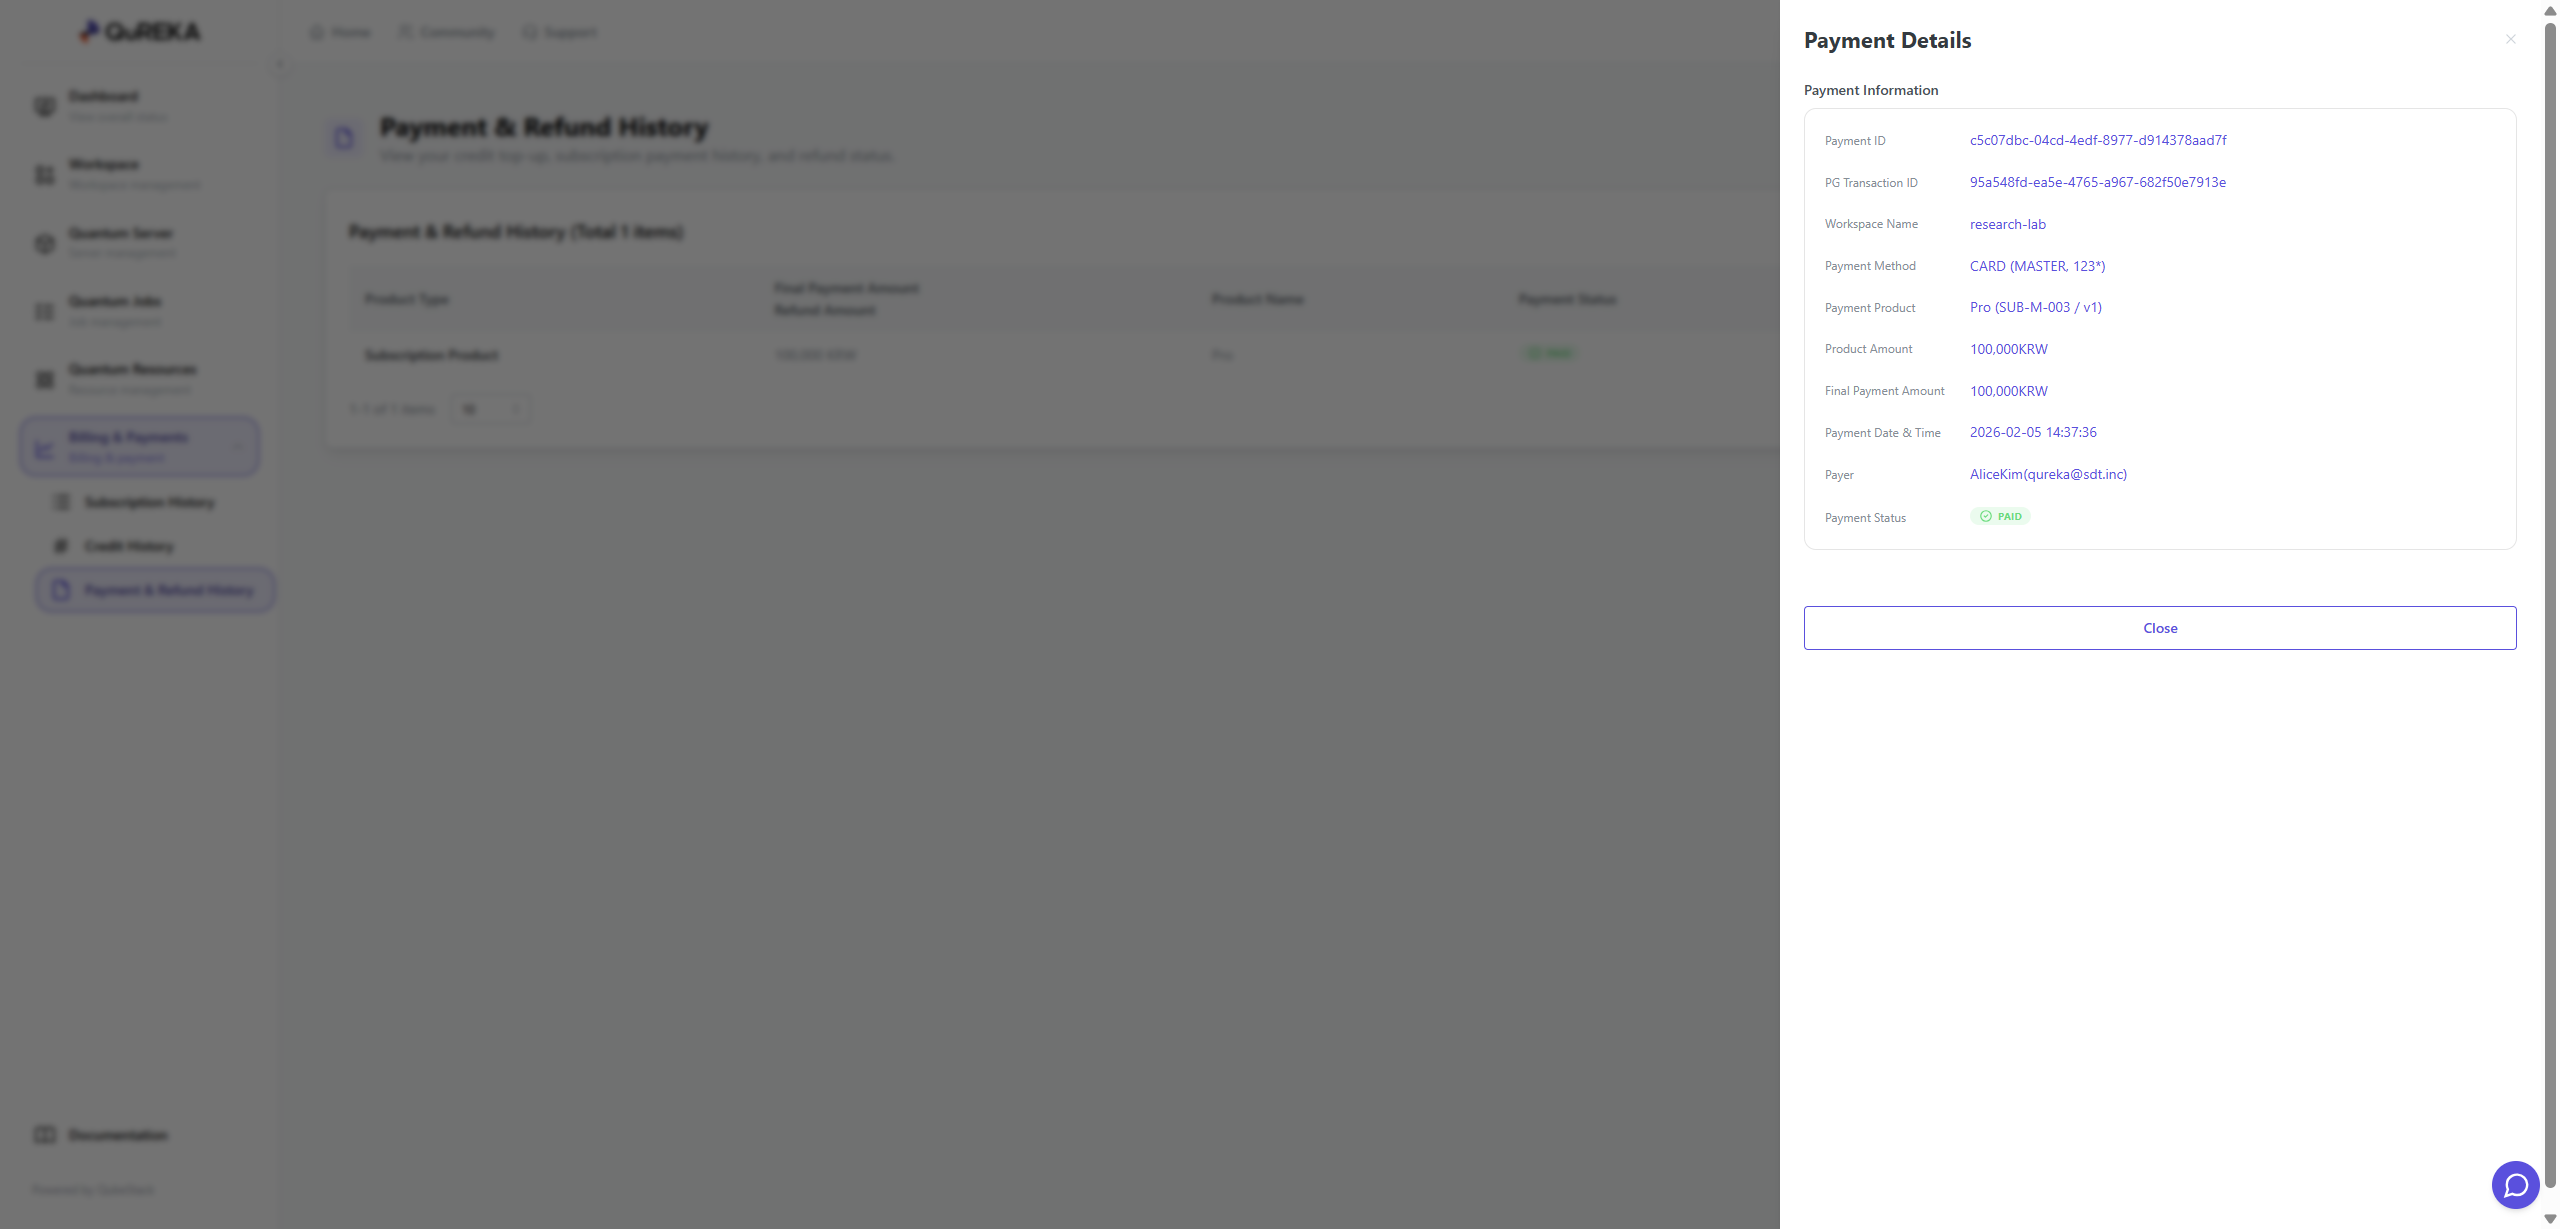
-
You can collectively view all Purchase History, such as subscription payments and credit recharges, as well as Refund History resulting from cancellations.
QuREKA-lab
QuREKA Lab
QuREKA Lab is a dedicated quantum algorithm development environment established by creating a Quantum Server.
- Server-Based Environment: You can access the lab by clicking the [Open] button in the Quantum Server list. It provides a development interface powered by JupyterLab.
- Customized Specifications: The development environment is configured precisely according to the hardware specifications (CPU, RAM, GPU, and Storage) you selected during the Quantum Server creation step.
- Consistent Development Experience: Based on high-performance computing resources allocated according to your subscription plan, you can reliably perform complex quantum simulations and algorithm designs.
Notebook
QuREKA Lab provides a powerful Python development environment based on JupyterLab, supporting an efficient workflow through dedicated extensions and AI-powered tools optimized for quantum algorithm development.
1. Jupyter Notebook Environment
-
Python-Based Development: Utilize standard Python libraries and quantum computing frameworks within a JupyterLab-based environment.
-
Instant Start: Create new Jupyter Notebook files and begin development immediately.
-
Sample Files Provided: Sample Notebooks containing example code for major quantum algorithms are provided by default to assist with learning and practice.
2. Dedicated Extensions and Support Tools
QuREKA Lab places optimized tools in the left and right sidebars for development convenience.
-
AI Assistant (Left Panel): Provides AI-powered assistance for quantum algorithm development and coding. You can easily access the conversational assistant from the left sidebar to receive support for complex implementation processes.
-
Right Panel Extensions:
-
Task (Job Monitoring): Monitor the real-time status and success/failure of your submitted quantum jobs.

-
Resource (Resource Information): View a list of available QPUs and simulators along with their detailed specifications.

-
Workspace (Workspace Information): Check current workspace details and your real-time credit balance.

-
Quantum Composer
Quantum Composer is a GUI-based quantum circuit design tool utilizing drag-and-drop functionality. It allows users to intuitively construct circuits without complex coding and view simulation results in real-time.
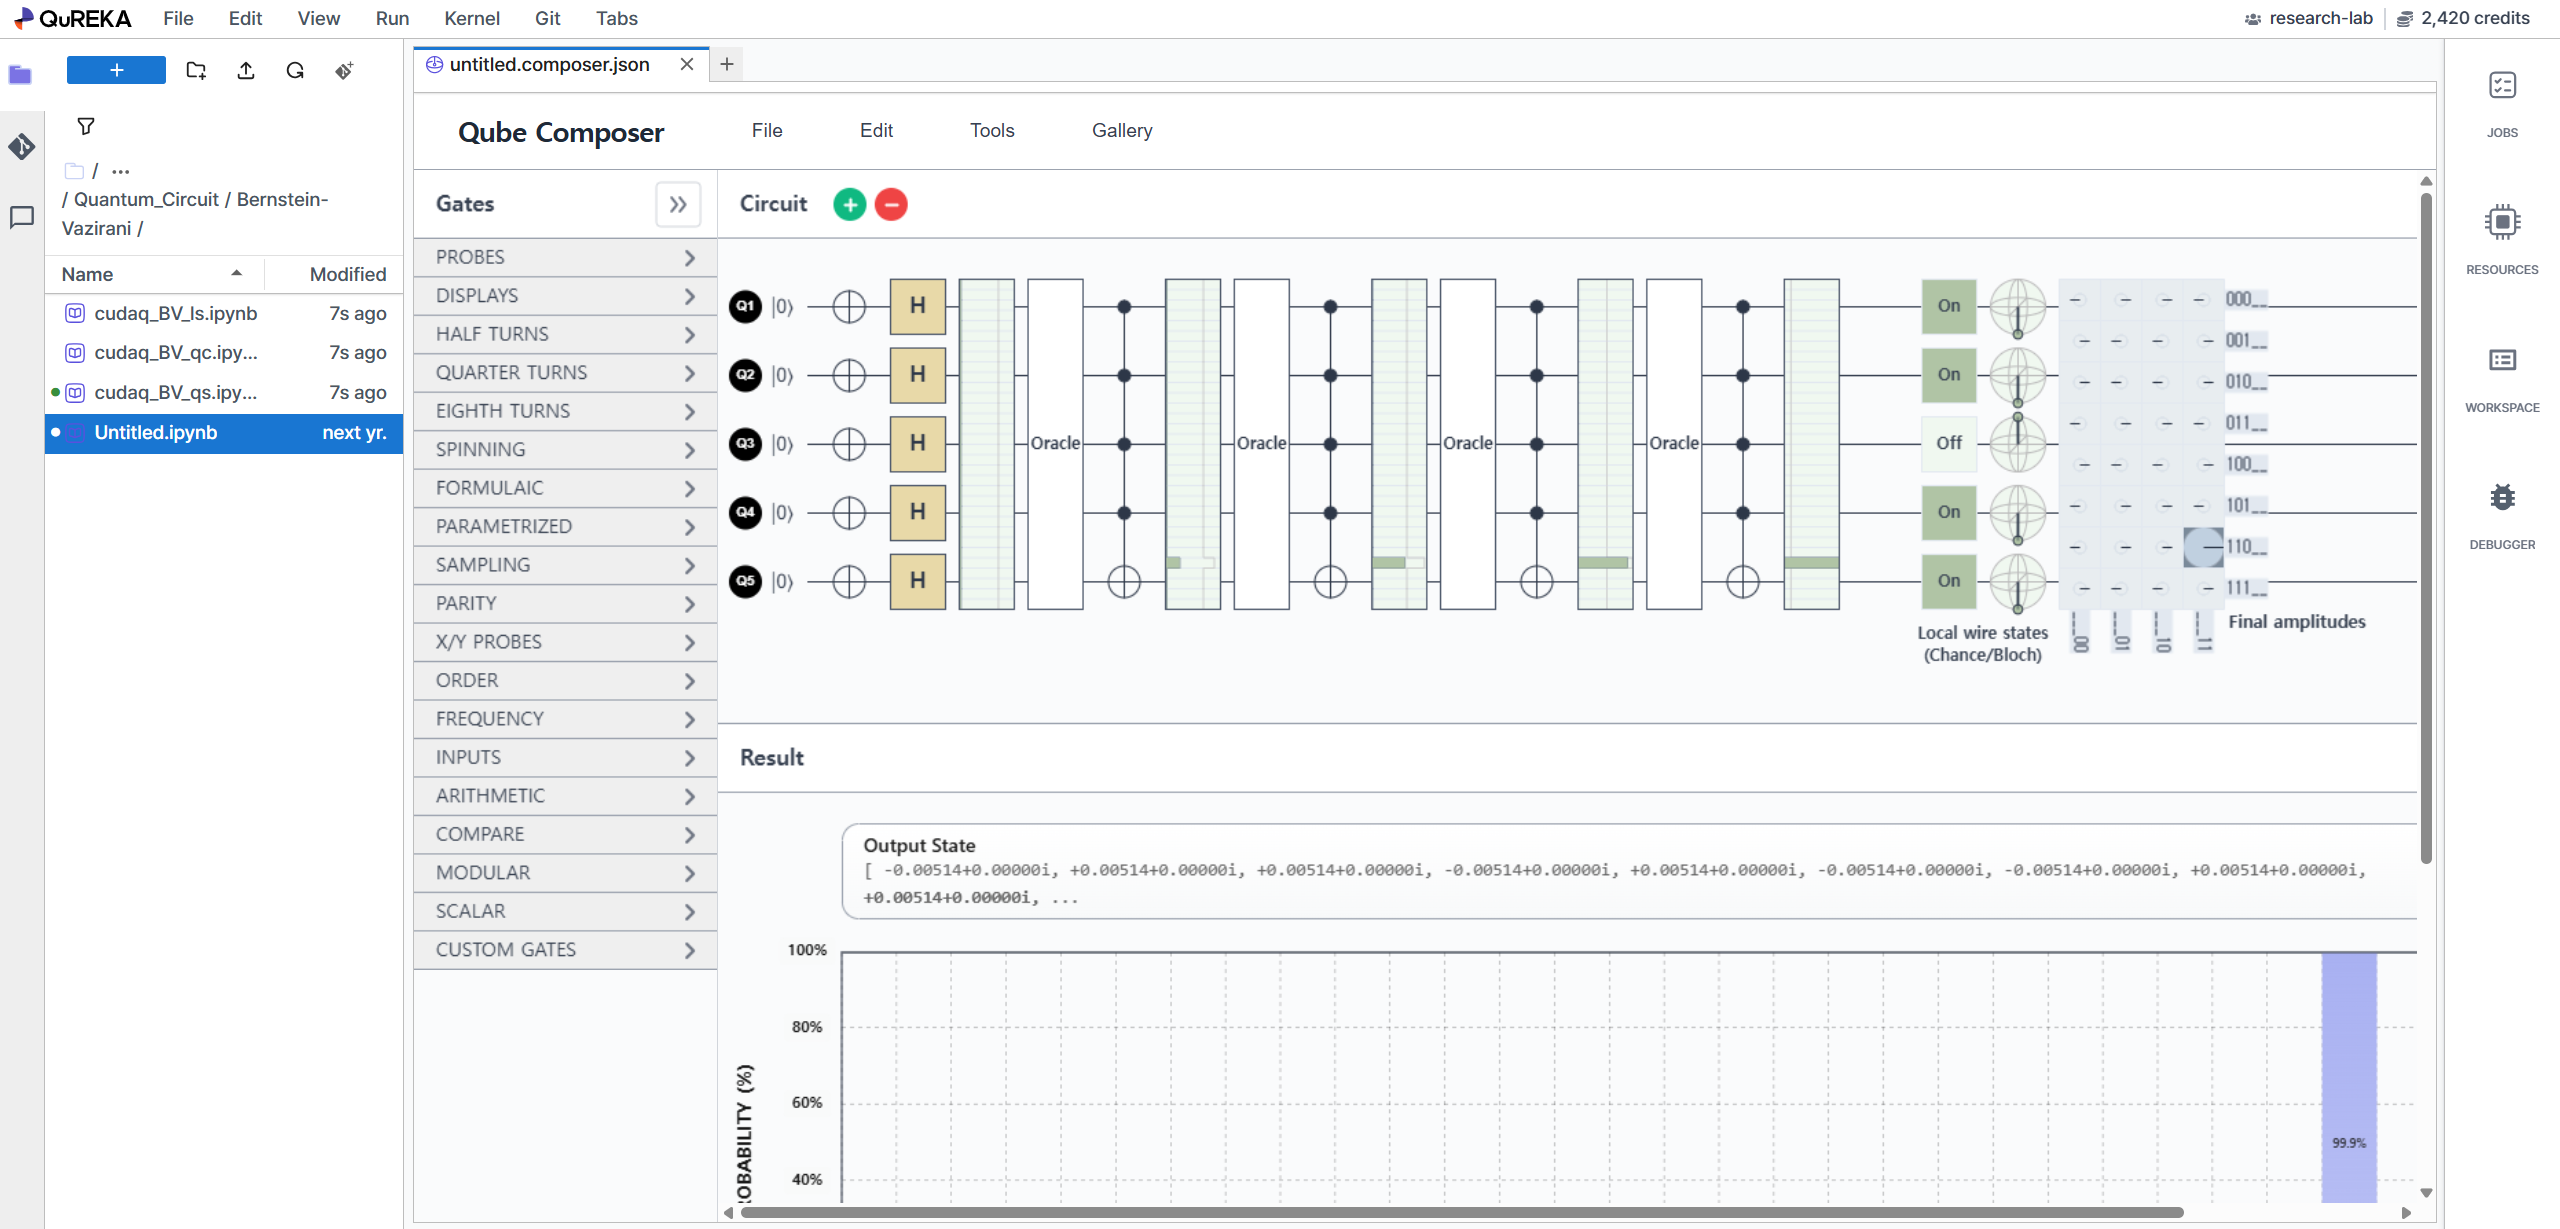
Key Features
-
Intuitive Design: Build circuits by placing gates and efficiently manage logical structures using slicers and barriers.
-
Real-time Simulation: Instantly updates output states and histograms for up to 16 qubits using GPU acceleration upon any design modification.
-
Visual Analysis: Provides a clear understanding of qubit phase changes and dynamic state flows through graphics and animations.
-
Multi-Environment Support: Convert designed circuits into over 10 different quantum languages, such as Qiskit and Cirq, or directly submit them to actual QPU and simulator resources.